
Root Moto Z3 and Install Magisk Custom Recovery [Tutorial]
The users of Moto are now showing their excitement to use the latest addition to the series is Moto Z3. It is the device that runs mainly on the Qualcomm Snapdragon processor. When it comes to this device, it has the 6 GB RAM along with the 64 GB of internal storage where you can expand the memory up to 256 GB using SD card. This 6.0 inch AMOLED display comes with Gorilla Glass for the best protection. At the same time, you can also experience the exciting dual 12 MP rear camera as well as 5 MP front Camera for taking selfies.
Apart from an amazing specification, one can also expect the good features from this device when it comes to usage on their device. For your information, this Motorola Moto Z3 is mainly running on the Android 8.0 Oreo. The features in this device will be going to excite the users for sure at a certain level of the stage. But still, some of the users could expect additional features and better performance of the device. This thing might consider being the limitations of this device.
However, as per your wish, you can easily boost the performance of the device although it has more great features. At the same time, you can also extend the battery life with the help of rooting. By rooting Moto Z3, you can easily kick start your customization internally without any difficulties. Once the rooting is done on your device, then there will also be has a chance of experiencing various features as well as the applications from different OEMs. Moreover, you can do whatever you want on your device by rooting it without any difficulties. By just installing the TWRP custom recovery on your device, you can root your device.
Contents
Root and Install Custom Recovery in Moto Z3 | Requirements
Before going through the process of installing and rooting, it is essential for the seeker to follow the requirements given below. It is also considered to be an important thing for the seeker to check it before the process doing on your device.
- Make sure to enable the USB debugging and initiate the ADB and FastBoot Tools accessing between the device and PC.
- It is important for the user to back up all the data of the device. In case, while doing the process, if anything goes wrong then it will be difficult for you to recover the data.
- Before starting the process, it is necessary for the users to charge their devices up to 80% to avoid the turn-off.
- At the same time, to root and install TWRP on Moto Z3, the user needs to unlock the bootloader.
- By unlocking the bootloader, it will help to enable the commands to execute fastboot. Flashing the TWRP custom recovery will be vital.
Must Read: How To Install Lucky Patcher APK on Android [With Root/Without Root].
Install TWRP Recovery in Moto Z3 [STEPS]
Here we are discussing some of the simple steps to install TWRP Recovery. Let’s have a look at how to install TWRP Recovery.
- At first, it is important for the users to download the TWRP image for Moto Z3.
- Now, you can copy the downloaded file to C:\adb where you can find the fastboot binaries.
- You can now connect the device to PC via USB cable. However, make sure to check whether the USB debugging is enabled.
- Now, the seeker can open the command prompt window, and it is important for you to reboot the Moto Z3 into fastboot mode by entering the below command.
- adb reboot bootloader
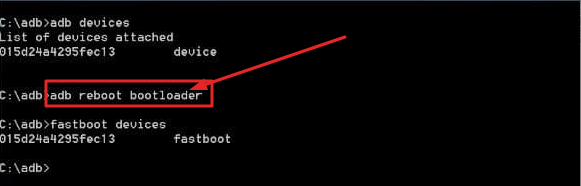
Add adb reboot bootloader Command
- Once the phone boots into fastboot mode, you can now enter the command given below when it comes to flash the TWRP on your device.
- fastboot flash recovery twrp_3.2.1-0_albus.img [Here we mentioned twrp_3.2.1-0_albus.img as an example and you should rename this with the name of twrp.img you have]
- It takes very few seconds to complete the process and once it is done, and then reboots the device.
- fastboot reboot
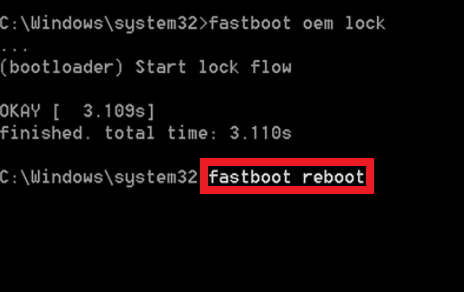
fastboot reboot
- Finally, the installation process of TWRP on MotoZ3 band is successfully done. Now, it is important for you to root your device with the help of Magisk.
Mod your android device once you root it using Xposed modules and framework. Read More: Download and Install Official Xposed Framework on Android 8.0 and 8.1.
How to Root Moto Z3 using Magisk [STEPS]
It is the final thing that you need to follow when it comes to rooting the device with the help if Magisk flashable ZIP. Thus the Magisk is considered to be the solution for rooting, and it is a root management interface. It also allows the user to install the modules which will help the user to customize the device without any difficulties.
- At first, you need to download Magisk flashable zip for Moto Z3
- Now, you need to copy the file to internal storage of your phone.
- Make sure to connect the device to PC.
- Now, the user can open the command prompt and enter the command given below to reboot your device Moto Z3 into the recovery mode.
- adb reboot recovery
- Once the device gets into the TWRP, you can now click the install
- You can search for the Magisk zip file you have downloaded and make sure to swipe the button available at the bottom of the display screen to flash Magisk and get set to root MotoZ3.
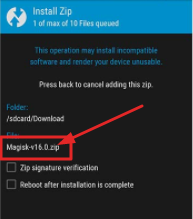
Swipe Magisk v16.0
- At last, the user can press the Reboot system button on the displaying screen.
Conclusion: Root Moto Z3 and Install TWRP Custom Recovery
If you are seeking for the steps to install TWRP and root MotoZ3, you can proceed with the above-given steps. It helps to improve the better performance of your device, and you can start to modify as per your convenience.
Read the following Articles:
- Root Vivo V9 and Install TWRP Recovery [TUTORIAL].
- [How-To] Root & Install Custom Recovery on LG JUDY (LG G7).