
Root Vivo V9 and Install TWRP Recovery [TUTORIAL]
Vivo SmartPhones has the new phone in its kit where the more number of Vivo users is planning for the purchase. Vivo V9 Smartphone is mainly running on the version of Android 8.0 OS. When it comes to this device, you can find some of the exciting features to experience like a fingerprint sensor and more. If you are searching the specification, then a device is mainly powered by Octa core Qualcomm Snapdragon processor. This phone will provide you with the smooth usage of multiple applications at a time.
However, despite the features available in the device, most of the device users would expect the number of features on their phone for sure. In this case, it is essential for the user to find the solution to sort it out. So, the users who all are looking forward to tweaking or modify internally, then it is possible with the rooting process. On the other side, you can also get it third party applications on your device without any hassles at any time. All you just need to follow the simple steps to install custom Recovery and do the rooting process.
If you are looking for installing the recovery, then you can try the best TWRP Recovery. By just installing on your device, you can tweak your device and get amazing features on your device to experience further. Moreover, you can also improve the battery life and customize the stuff inside the device as per the wish. So, before going through the process of installing the TWRP on your device, make sure to find the requirements and follow it as per the instruction.
Contents
Pre-requisite to Root Vivo V9 and Install TWRP Recovery
As we mentioned earlier, before following the installation process, it is essential for the users to follow some of the requirements. Let’s follow the requirements given below.
- Make sure to charge up your device up to 80% before getting into the installation process.
- Thus the bootloader must be unlocked
- It is important for the users to follow the steps carefully to avoid the issues.
- Get USB cable to connect your PC during the process
- The installation process is only for Vivo V9
These are some requirements that you need to follow before getting into the process. Hope it will be useful for all the seekers to complete the installation process in an easy manner.
Must Read: Download and Install Official Xposed Framework on Android 8.0 and 8.1.
Things to Download:
During the installation and rooting process, it is essential for the seekers to download the required files. Let’s have a look that what are all the files need to be downloaded.
How to Root and install TWRP Recovery on Vivo V9 [STEPS]
To install it, it requires the steps to follow below.
- First of all, keep it in mind that the rooting process requires the installed custom TWP Recovery on your device.
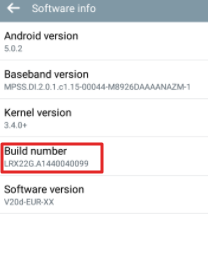
- When it comes to enabling USB debugging, you need to visit Settings -> About Phone -> Tap on Build number till to see the message on display screen like “You are now a developer.”
Tap on Build Number
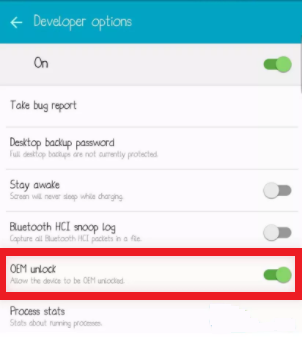
- You can now have the developer option, so visit Settings -> Developer options -> Enable USB debugging and make sure to enable OEM to unlock.
Unlock OEM
- It is necessary to download TWRP recovery image for a device
- Now, the user can connect the device to PC using the USB cable. Make sure to check that the PC has all Vivo V9 USB driver gets installed. You can now create a folder and name it as Fastboot and copy to the TWRP Recovery img in Fastboot folder.
- You can now press the Right keys click + left shift to open the command prompt window and choose the Open command window here.
- By following the given below command, you can now boot the device Vivo V9 into the fastboot mode.
- fastboot reboot bootloader
- Mac: ./fastboot devices
- Windows: fastboot devices
- The user can now check the connected device list by entering the command below.
- fastboot devices
- Mac: ./fastboot devices
- Windows: fastboot devices
- To flash TWRP recovery follows the command below
- Fastboot Flash TWRP recovery.img.
- Mac: ./fastboot devices
- Windows: fastboot devices
- Finally, thus the TWRP recovery is successfully installed on your device.
- To reboot your device make sure to follow the command Fastboot Reboot
How To Root Vivo V9 from TWRP [STEPS]
- It is necessary for the users to download rooting package in Vivo V9
- You can now place the root zip on the SD card
- Make sure your device to boot it into TWRP recovery mode
- Hold the keys Power + Volume down to boot in custom recovery mode
- Once if you entered TWRP recovery mode, you could release the keys
- Get set to click on Backup and complete the backup process of a current OS. It will help during the flashing process in case if anything goes wrong.
- The user can click on the option “Install” and get SuperSU zip file.
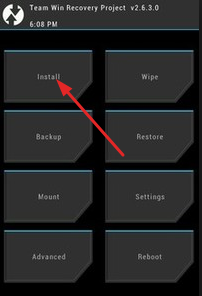
Hit the Install Option on TWRP
- You need to swipe the button to confirm the process of installation.
- Finally, the rooting process is done successfully, and you can tap reboot system.
- Thus the rooting is done on your device with the help of SuperSU.
Conclusion: Root Vivo V9 and Install TWRP Recovery
So, the Vivo V9 users who all are looking forward to customizing their device for many exciting features to experience can check out the above process. It is necessary for the users to follow all the steps without skipping it.
Read the following articles:
- Root & Install Custom Recovery on LG JUDY (LG G7).
- [How-To] Root & Install Custom Recovery on HTC U12.
3 thoughts on “Root Vivo V9 and Install TWRP Recovery [TUTORIAL]”