
[How To] Root and Install Custom Recovery on HTC Desire 12 and 12 Plus
According to the report, HTC Desire 12 and 12 Plus are considered to be the large screen display Smartphone. When it comes to 12 plus, it is said to be the octa Qualcomm Snapdragon 450 SoC. If you are looking for a camera, then the rear camera has its 13-megapixel and front camera of 8-megapixel. As per the sources, it has the inbuilt storage of 32GB where you can also expand your phone’s memory via SD card. 2965mAh battery mainly powers it. However, apart from the features available in these devices, people who all are looking for more features to be updated can go over custom recovery.
The users of these devices who all are seeking for the custom recovery can go for TWRP Recovery. This custom recovery is mainly said to be the TeamWin recovery which is built with the interface of touchscreen enabled. Once it is done, it will allow the users to install any third party applications as per their wish and also make a backup. Usually, when it comes to back up, it is considered to be unsupported by stock recovery images as per the sources.

Here, we are going to check out that how to root and install a custom recovery on HTC Desire 12 and 12 plus devices. If you are looking for exposing the full potential of Android device, then TWRP recovery is the best solution. By following this custom recovery, you can easily root your device. Once custom recovery is installed on these devices, and then you can install Custom Mods, any zip files, and custom ROM at any time. When it comes to the installation process of Custom recovery, then it is essential for the users to unlock the bootloader. Once it is done, then you can proceed the process further in a safety way.
Contents
Benefits of Installing TWRP Recovery on HTC Desire 12 and 12 Plus
Before going to install a custom recovery on your device, make sure to know some of the advantages. Hope it will be beneficial for you to know and proceed further.
- Once you install TWRP Recovery, you can easy use Xposed Modules.
- The user can flash the image file
- By using TWRP recovery, the user can remove all bloatware
- To customize your device, the user can flash modding zip files.
- The user can access this custom recovery to clean cache, data and wipe.
- Flexible to restore the Nandroid Backup.
You can easily root your android device without the help of a PC. Read More: Root Android Phone Without Computer or PC [ Latest Working Methods ].
Important Requirements for Installing Custom Recovery (TWRP) HTC Desire 12 and 12 Plus
Here we are providing the requirements for your devices HTC Desire 12 and 12 plus. It will be helpful for all the users to follow further for easily installing custom recovery without any hassles.
- First of all, make sure to charge up your device up 80 %.
- The user needs to carry PC or laptop.
- Get ready to back up your device for safety purpose.
- You need to download ADB tool setup and extract it.
- Now, it is essential for you to download chainfire Super SU.zip
- Make sure to unlock the bootloader on HTC Desire 12 and 12 plus.
It is essential for the users to follow all the above-given points and don’t try to skip any of the points in any case.
Install TWRP Recovery on HTX Desire 12 and 12 plus [STEPS]
Note: It is essential for the user to rename TWRP Recovery to Recovery
- First of all, it is important for the users to enable USB Debugging. Visit your settings -> About Phone and now continue tapping on the build number until you see the message Developer option enabled.
enable developer options
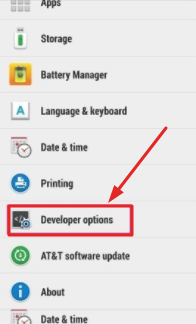
- After the developer option is successfully activated, now the user needs to get back to settings and open “developer option” then enable “USB Debugging“.
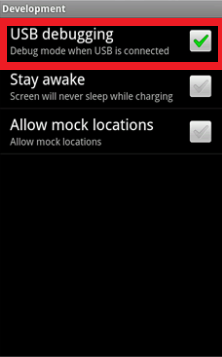
USB debugging is enabled
- Now, you can search and open the extracted ADB folder on your PC or Laptop. By pressing Right click in mouse and shift key together, you can open a command window.
- You can now connect your device to PC with the help of USB cable.
- All you just need to reboot the device into bootloader. However, to reboot, make sure to follow the below command.
- adb reboot bootloader
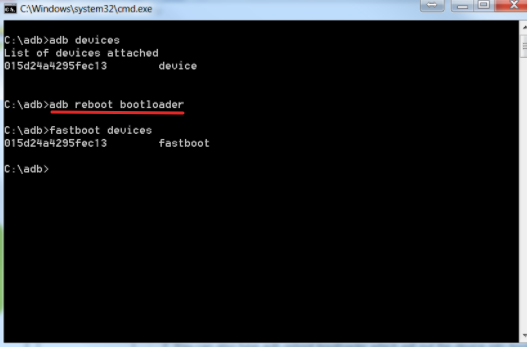
adb reboot bootloader
- Now, you can see that your device will boot into bootloader. If you see that your device doesn’t boot it properly, then make sure to check whether the USB drivers and cable are installed properly.
- The user needs to type the below command in the command window.
- fastboot devices
- Once the command is typed, it will help the user to show the connected device. If you didn’t see any list, then you should assume that the drivers are not installed properly.
- When it comes to flash the memory, you need to type the command given below.
- fastboot flash recovery recovery.img
- If any of the command it shows, then reboot your smartphone. Finally, TWRP is successfully installed.
- If you are looking for a reboot to recovery, you need to switch off your device by pressing power button + volume up together to boot into the bootloader. Now, you need to press volume up and down to navigate and choose recovery then press the power button to boot it.
Bought a new Redmi note 5/Note 5 pro and stuck on how to root the device? Read more: Unlock Bootloader & Root Xiaomi Redmi Note 5 / Redmi Note 5 Pro [Tutorial].
Root HTC Desire 12 and 12 plus using TWRP Recovery [STEPS]
- At first, you need to download SuperSu.zip, if you haven’t downloaded it.
- Make sure to move the SuperSu.zip file to the SD Card.
- By pressing Volume down + power, make sure to boot your device into recovery.
- By following the TWRP Recovery, you need to click the install option then browse and select the SuperSu.zip.
- Get ready to swipe for installing SuperSu.
- If installed, the rooting process will be working.
Conclusion: Root and Install Custom Recovery on HTC Desire 12 and 12 Plus
If you are a user of HTC Desire 12 or 12 plus who is waiting for a long time to install a custom recovery, then you can follow the above-given process. It will be helpful for you to proceed further when it comes to root and install a custom recovery on your device.
Read More:
- How to edit Build.prop file without rooting your device [Tutorial].
- [How-To] Root & Install Custom Recovery on LG JUDY (LG G7).