
[How-To] Install TWRP recovery on Any Samsung device using Odin
In the fast-growing technology world, Smartphones are dominating the world by providing the exciting stuff to the users. When it comes to a device, most of the phones will come up with the default applications. However, apart from the stuff available in the mobile, most of them will be seeking to tweak their phone according to their wish. For instance, if you are looking for the device to root and others as per your interest, you can easily do. If you are a user of Samsung device, then definitely you will be aware of Odin.
For your information, Odin is the software which is mainly used in all the service centers to flash or update Samsung devices. So, it is difficult for the users to getting Odin service in general. By using you can easily sort out of custom kernels, flashing stock Samsung ROMs and also bring on the custom recoveries like TWRP. By following the TWRP recovery, you can easily go for plus or flash rooting, backups and other stuff. Thus the TWRP is considered to be the open source object where anyone can run the recovery possible for Android device.

People who all are looking for TWRP recovery for your device, then you can easily visit the Teamwin official repository for the recovery process. However, you can also find the unofficial TWRP for your device. The thing you want to keep it in mind is before going to install TWRP on your Samsung device, make sure to back up all of your current data. So, people who want to Flash TWRP recovery using Odin can follow the below stuff. Hope it will be helpful for all the Samsung Android device users. All you just need to follow the proper instruction given below while installing TWRP Recovery.
Contents
Pre-Requirements for Installing TWRP on Samsung Android devices Using Odin
Before going to install TWRP Recovery on your device, make sure to know about the requirements. It is essential for all the seekers to follow further.
- While performing in this process, your device should have more than 80% of battery.
- The bootloader must be unlocked
- You need to install Samsung USB drivers on your PC without any fail.
- Make sure to get .tar file of TWRP Recovery for your device
- Download TWRP Recovery and Odin flash tool on your computer
Must Read: [How-To] Root Samsung Galaxy S9 and Samsung Galaxy S9 Plus.
The given requirements are needed to be followed before going to install on your device. For more details regarding the installation process, you can follow the below stuff. It will be useful for all the users.
How to Flash TWRP Recovery on Samsung Devices Using Odin
Generally, when it comes to the installation process, it will be difficult for the people to go further without knowing the proper steps. By following the above-given pre-requirements, you can start to install without any difficulties. Here we are going to issue some of the simple steps to check out. By following the given stuff, you can easily install TWRP Recovery using Odin without any hassles. Let’s follow the simple steps given below.
- First of all, the user needs to unzip the Odin12.3.zip file you have downloaded and get ready to run an odin3 v3.12.3.exe file on your system by extracting the files.
- As we mentioned earlier, it is essential for the user to download Odin flashable TWRP recovery.tar file and makes it compatible with a device.
Now, you need to visit the settings -> About phone and get ready to click build number to enable the developer options.
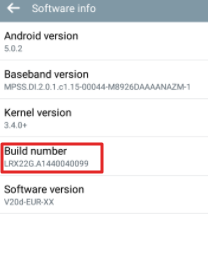
Click on Build Number to Enable Developer Option
- The user should get back to the main settings page and select “Developer ”
- By following the Developer options, you can look for enable OEM to unlock and make sure to enable it. Now, get ready to turn off your device.
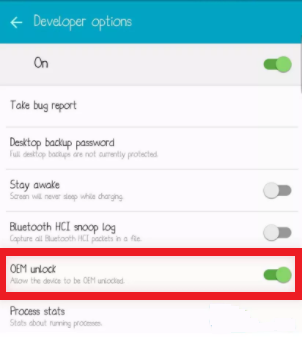
enable OEM to unlock
- Make sure to hold home + power + volume down buttons together until the warning screen appears.
- You can now click volume up on the screen and gets set to boot into download mode.
- If you see your device in download mode, you can connect it to PC with the help of USB cable. You can see now the Odin windows on PC will help to detect the device and displays Added.
- Now, you need to click on the AP tab which is available in Odin window and make sure to choose TWRP recovery .tar file already downloaded on your device.
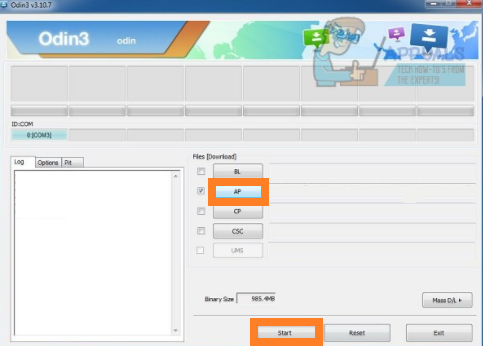
Click AP tab on Odin
- It is essential for the user to select the start button on Odin and wait for few minutes until the process is completed. Once it is done, you can see a pass message display on Odin screen.
- Finally, your device will reboot when the Odin is flashed. Now, you can disconnect the device without any difficulties.
You can easily flash Super SU on your device using TWRP by following this process. Read More: [How-To] Flash SuperSU using TWRP recovery and Root any Android device.
How to boot into TWRP Recovery in your Device
To boot your device, you need to follow the respective steps. Let’s follow the given steps.
- First, switch off the Now, press and hold the buttons Home + power + volume up until you see device logo on the screen. At last, your phone will boot to TWRP Recovery.
These are the simple steps that you want to follow for boot into TWRP recovery on the device at any time.
Conclusion: Install TWRP Recovery on Samsung Android devices Using Odin
If you are using any Samsung android but needs to flash your device with the help of TWRP Recovery, then the above-given steps will be useful. We have also discussed the steps given above to boot and flash. Once it is done, you can root, unroot, unlock the bootloader and do more stuff as per your interest at any time.
Read More:
- Solution to Prevent RMM State Lock on all Samsung Devices [Guide].
- How To Install Lucky Patcher APK on Android [With Root/Without Root].