Root Huawei P20 Pro and Install TWRP Custom Recovery [Tutorial]
Root Huawei P20 Pro & Install Custom ROM: So you are the proud owner of the latest P-series flagship phone, P20 Pro, from Huawei. First of all; Congratulations for your new device. Huawei P20 Pro is pretty new in the market but if you are looking to root your Huawei P20 Pro device and installing custom ROM on it then you are at the correct spot.

Image Source: www.expertreviews.co.uk
So what is a custom ROM? A stock ROM is the software that ships with your Android device. Since it is open source custom ROMs are developed which are the altered or modified version of the original software containing some tweaks. Before going ahead with the procedure to root and install custom ROM on Huawei P20 Pro make sure you fulfill the following prerequisites:
Contents
- 1 Root & Install Custom Recovery on Huawei P20 Pro | Pre-requirements
- 1.1 Steps to Install ADB and Fastboot onto your Windows PC/ Laptop
- 1.2 Unlock Bootloader of Huawei P20 PRO [Steps]
- 1.3 Install Custom Recovery TWRP on Huawei P20 Pro [STEPS]
- 1.4 Root Huawei P20 Pro using Super SU [STEPS]
- 1.5 Install Custom Rom on Huawei P20 Pro [Steps]
- 1.6 Root and Install Custom Recovery TWRP on Huawei P20 Pro
Root & Install Custom Recovery on Huawei P20 Pro | Pre-requirements
- Before going ahead with the process, please make sure that you have taken backup of all your important data and the battery level of your device is greater than 75%.
- Now please download the following files which are required for the process to root your Huawei P20 Pro .
- ADB and Fastboot Setup
- TWRP Recovery Image File
- SuperSu.ZIP
Now, before installing any custom ROM you are required to root your Android device and install custom recovery on it. We will use TWRP (Team Win Recovery Project) Custom Recovery for the purpose. As a first in the process please install ADB and Fastboot on to your Windows PC/ Laptop.
Steps to Install ADB and Fastboot onto your Windows PC/ Laptop
- Just launch the setup file for ADB and Fastboot from your Windows PC/ Laptop.
- Simple installation instructions will come in front of you.
- Within few minutes the installation will be done. Navigate to the folder where you have installed ADB and Fastboot.
- Press Shift + Right Click and hit the option of ‘Open Command Window Here.’
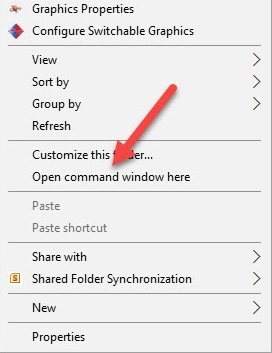
- A command prompt window will open up in front of you.
The next step in sequence is to unlock the bootloader of your Huawei P20 Pro . Following are the steps for the same.
Unlock Bootloader of Huawei P20 PRO [Steps]
- For ADB to detect your device; you must have USB Debugging enabled on it.
- To enable USB Debugging go to the ‘About’ page of your device and click on the option of ‘Build Number‘ a few times.
- Thereafter in ‘Settings’ you will get an option of ‘Developer Options.’
- Click on it and activate the option of ‘USB Debugging.’
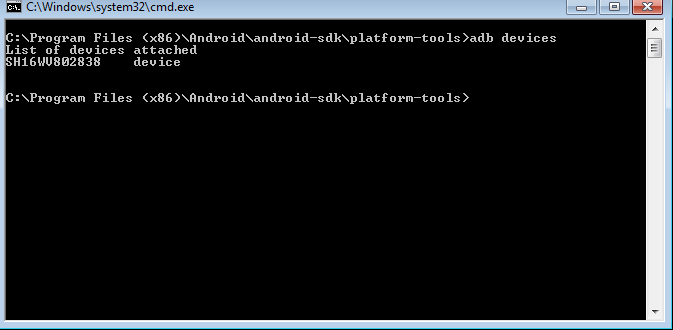
- Connect your Huawei P20 Pro device to your Windows PC/ Laptop and in the Command Prompt which you opened in the ADB Folder type ‘adb devices’ to check out your device is coming.
- Now for unlocking bootloader you are required to make your device enter into ‘Fastboot’ mode. For that, switch off your device and press Power and Volume Down button of your device for 10 seconds. As you release them; your device will enter into fastboot mode.
- Type the command below command and your device will be visible now.
fastboot devices
- Thereafter enter the below command.
fastboot oem unlock
- Post entering the above command the bootloader of your Huawei P20 Pro will get unlocked.
Now please follow the below-mentioned steps to install custom recovery TWRP on your Huawei P20 Pro which is essential to root and install custom ROM on your Huawei P20 Pro :
Install Custom Recovery TWRP on Huawei P20 Pro [STEPS]
- Just cut and paste the TWRP file which you downloaded into the ADB and Fastboot folder. Please rename the file to ‘recovery.img.’
- Type the below given command to reboot your device in bootloader mode.
adb reboot bootloader
- Now type and TWRP recovery will successfully get installed on your Huawei P20 Pro .
fastboot flash recovery recovery.img

Root Huawei P20 Pro using Super SU [STEPS]
- With the installation of TWRP the rooting process is next which is really simple. Just transfer the SuperSu.ZIP file to the internal memory of your device.
- Now reboot your Huawei P20 Pro in recovery mode. For that please press Volume Up + Power Button after switching off your device.
- Following TWRP screen will be visible.
- Hit the option of ‘Install’ and find the SuperSu.ZIP file. Select the file and swipe to give your permission and confirmation for the installation.
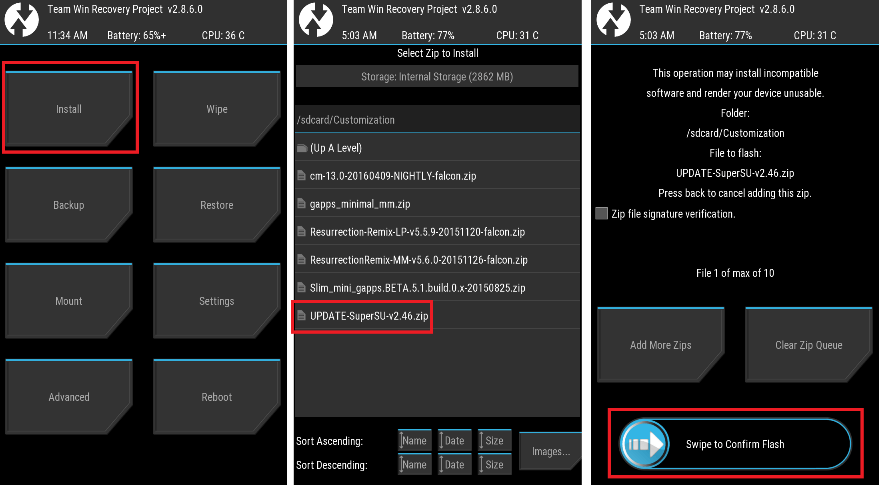
- That’s it you will successfully root your Huawei device this way. For checking whether your device is rooted or not you can download the ‘Root Checker‘ application which is readily available in Google Play Store.
Must read: Unlock Bootloader on Huawei P20 [Latest Tutorial].
Install Custom Rom on Huawei P20 Pro [Steps]
Now if you want to install any other custom ROM on your Huawei P20 Pro you need to reboot your device again in recovery mode like you did above and follow the below steps:
- Select ‘Wipe‘ and select ‘Swipe to Factory Reset‘ from TWRP menu. However if the custom ROM which you are installing doesn’t require factory reset then you can skip this step.
- Now head to ‘Install‘ option and select the custom ROM from its location and do ‘Swipe to confirm flash.’
- Post successful flashing of ROM an option of ‘Wipe cache/dalvik‘ will come in front of you. Hit ‘Swipe to Wipe.’
- That’s it you are done. Just go back to the TWRP menu and select the option of Reboot – Reboot System.
Root and Install Custom Recovery TWRP on Huawei P20 Pro
So folks, this was the process to root and install custom ROM on your Huawei P20 Pro device. In case you have any questions to ask or getting stuck anywhere please let us know by dropping your queries in the comments section below. Looking forward to assist you.
You may like the following posts:
- Root Samsung Galaxy S9 and Samsung Galaxy S9 Plus
- Install Lucky Patcher APK on Android [With Root/Without Root]