
Samsung Galaxy S9 and Samsung Galaxy S9 Plus: Root and Install TWRP
Root Samsung Galaxy S9 & Samsung Galaxy S9 Plus: People root their Android phones so as to get access to various functions which are otherwise not available in non-rooted Android devices. If you are one of those people then you are reading this post as you are a proud owner of the latest flagship phones from Samsung; Samsung Galaxy S9 and Samsung Galaxy S9 Plus and wish to root it. In this guide we are going to tell you working methods to root your Samsung Galaxy S9 & Samsung Galaxy S9 Plus device.

Contents
Root Samsung Galaxy S9 & Samsung Galaxy S9 Plus
Method # 1: Root Samsung Galaxy S9 & S9 Plus (S9 +) with TWRP
- First of all before commencing the process to Root Samsung Galaxy S9 you are required to take care of certain prerequisites.
- Make sure that the battery level of your device is more than 60%.
- You must have USB Drivers installed on your PC/ Laptop so that your device is recognizable by your PC.
- Make sure that you have enabled USB Debugging and turned on the option of OEM Unlock on your device.
- Also please do take a complete backup of your precious data before commencing to root Samsung Galaxy S9 & S9+.
- Download SuperSU from the following link.
- Also download No-Verity-Opt-Encrypt from here.
- Make sure that you keep the ‘Super SU‘ and ‘No-Verity-Opt-Encrypt‘ in the internal memory of your Samsung Galaxy Device.
- Thereafter you need to install the custom recovery, TWRP, in your Samsung Galaxy device. For installation of TWRP please follow the below-mentioned steps:
- To install TWRP; first of all download it for your Samsung Galaxy S9 & S9 Plus device from the following link.
- Do enable USB Debugging on your device before going ahead with the installation.
- You can use ADB for installing TWRP. For that first locate and navigate to the folder where TWRP Recovery image file is present on your PC.
- Now open the command window for that folder. Just press Shift + Right Click and select the option “Open Power Shell Window Here.”
- Connect your Samsung Galaxy S9 or S9 Plus device to PC and enter the following command to restart your device into boot-loader mode.
- adb reboot bootloader
- Thereafter once your device has successfully arrived to boot-loader mode enter the following command.
- fastboot flash recovery twrp-2.8.x.x-xxx.img
- Do change the name of the twrp.img file with the name of your TWRP file.
- That’s it. TWRP recovery will get successfully flashed on to your device now.
- Just reboot your device thereafter by typing in the following command.
- fastboot reboot
- Once TWRP is successfully installed onto your Galaxy device please reboot into recovery mode by pressing and holding the combination of “Volume Up + Power Button” on your device.
- Thereafter you will see the TWRP screen in front of you. You need to format the data from your device. Make sure that you have taken a complete backup before formatting. Just click on Wipe -> Format Data -> Type ‘Yes.’
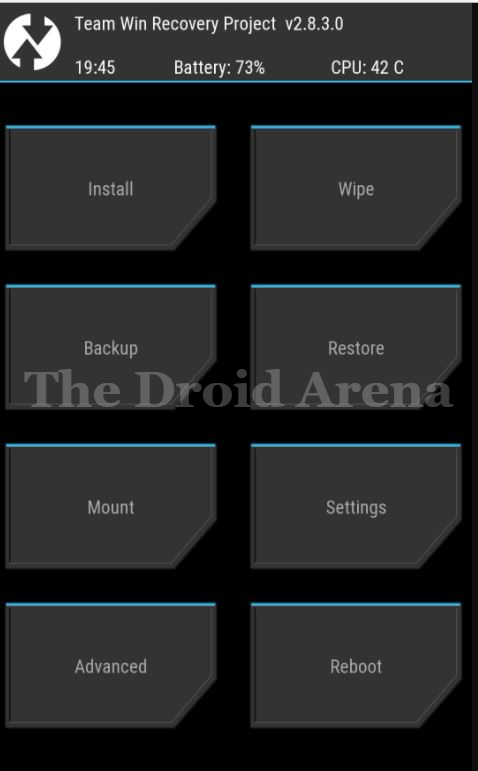
- Post wiping the data again go back to the home screen of TWRP and choose the option of Reboot -> Reboot into recovery -> Do not install.
- This first reboot might take some time so please don’t panic and have patience.
- Now you are required to choose ‘Install’ from the main menu and select the ‘No-Verity-Opt-Encrypt’ ZIP file for installation which you have already downloaded earlier.
- Post installation of No-Verity-Opt-Encrypt again select the ‘Install’ option and proceed to install Super SU which you have downloaded earlier.
- That’s it folks! This way you will successfully root Samsung Galaxy S9 or Samsung Galxy S9 Plus.
Method #2: Root Samsung Galaxy S9 & Samsung Galaxy S9+ Using One Click Root
- I bet you must be finding the Method #1 to be quite complex. However there is an easy approach to root Samsung Galaxy S9 & Samsung Galaxy S9+. The root can be accomplished using One Click Root.
- One Click Root can even help you UnRoot your Android device with just a single click in case you don’t like the rooted functionality.
- Moreover, it offers 24/7 Support for your rooted Android Device and even helps to Install ROMs, MODs as well as various modded, rooted and cracked Android applications.
- One Click Root helps you to uninstall bloatware from your Android device thus increasing the speed as well as efficiency of your device.
- The steps to root Samsung Galaxy S9 or Samsung Galaxy S9 Plus, using One Click Root, are pretty simple.
- First of all download the One Click Root Apk by navigating to the following URL: [https://www.oneclickroot.com/download-apk/]
- Post successful installation of the application launch it and connect your Samsung Galaxy S9 or Samsung Galaxy S9 Plus to your PC/ Laptop.
- Once you connect your device; One Click Root will identify the connected device.
- When the application successfully identifies your device click on “Root Now” button to begin the Rooting process.
- Now the rooting process will start. Be patient and wait for the process to get over.
- Once the process is over; all you need to do is to restart your Android device.
- That’s it you are able to successfully root Samsung Galaxy S9 or Samsung Galaxy S9 Plus device.
Conclusion: Methods to Root Samsung Galaxy S9 & Samsung Galaxy S9 Plus
That’s it folks. These were the methods to Root Samsung Galaxy S9 & Samsung Galaxy S9 Plus.
If you face any kind of confusion or get stuck anywhere during the process to root Samsung Galaxy S9 or Samsung Galaxy S9 Plus please do let us know by putting down your comments in the comments section below. Also please feel free to ask any sort of related questions.
You may like the following posts:
- Download and Install Official Xposed Framework on Android 8.0 and 8.1
- What is CyanogenMod? How To Install CyanogenMod 13 ROM On Your Android Device