
[How To] Fix Status 7 Error When Install Custom ROMs and OTA Update
We all know that the Android is considered to be the open source platform which helps the users to do custom activities like flashing custom ROMs, mods, gaining root access and installing a custom Recovery. If you enhance best mobile experience, then customization will always help you to go ahead. Most of the users are aware of flashing process for the best mobile using experience. During the time of this process, most of the people will face the better result, and sometimes they face the issues as well.

During the time of this process, you may face the things like encounter errors, boot loops and seek for the solution at the end. Here we are going to see the stuff which helps to fix the status 7 error on your Android device. It is this thing that most of the people often reporting and seeking the solution. During the time of downloading and sideload OTA update package on a device, most of them will face the issues.
Contents
[How To] Fix status 7 Error while sideloading OTA Zip
Generally, we usually show our love and eagerness when it comes to updating the software from OEM to get more exciting features, improvements, and goodies. However, most of the time, people do not receive the OTA on time due to the limitations. During the time of a process, people would like to find the OTA zip file for an update by sideloading it on a device. Some of the people may experience the smooth thing, but on the other side, some might experience the status 7 error on the display screen.
Verifying current system…
/dev/block/platform/msm_sdcc.l/by-name/system has been remounted R/W; reflash device to reenable OTA updates
(Status 7)
Installation aborted.
(Or)
Installing update…
Verifying current system…
“/system/bin/mpdecision” has unexpected contents.
E:Error in /tmp/update.zip
(Status 7)
Installation aborted.
(Or)
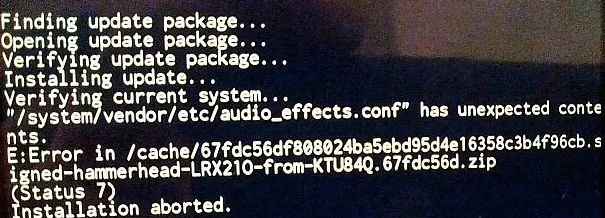
Finding update package…
Opening update package…
Verifying update package…
Installing update…
Verifying current system…
“/system/app/Drive.apk” has unexpected contents.
E:Error in /tmp/update.zip
(Status 7)
Installation aborted.
Status 7 Error
Apart from the above errors that you see in the display, there will also be a chance of getting further more issues while installing the stock OTA zip file or sideloading. At the same time, if you see the status 7 errors when it comes to installing the OTA, then you to find the mistakes that you have done without knowing. You also need to know about the issues before going to install the OTA. Some of the things given below may cause Status 7 errors:
- If you install a sound mod or system application on a device you can face this error.
- This error may appear while you install Custom ROMs on a device
- Without rooting it, did you disable any of the system apps by visiting Settings -> Apps.
- If you install a custom recovery on the device.
- When you flash custom kernel.
By following the above things, if you found an answer for the above thing is yes, then it is essential for you to fix it first and then get into the process of OTA installation. To fix the issue, you need to restore the device to stock by just flashing the stock firmware.
Must Read: How to Enable Face Unlock Feature on Redmi Note 4, Redmi 4/4X, and Mi Max Prime.
For Nexus Users: If you are the user of Nexus device who used to see the unexpected contents by displaying the message like.
Verifying current system…
“/system/<SOME>.apk” has unexpected contents.
E: Error in /tmp/update.zip
(Status 7)
Now it is essential for you to download the factory images for the device and make sure to extract the downloaded file. You can now open the firmware folder and get to see the .zip file. However, you can now unzip the system.img file and get ready to flash it with the help of ADB command.
- fastboot flash system system.img
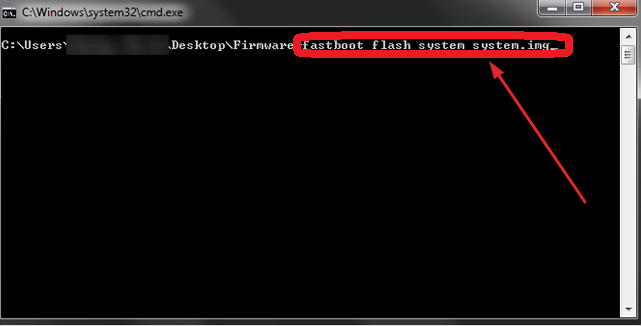
fastboot flash system system img
By flashing the system will be helpful for the user to restore all the system apps and get set to install the OTA.
For your information, if any of the users who have installed Franco kernel when it comes to Nexus device and facing the installing issues over OTA zip, then follow the given below steps.
- First of all, make sure to flash the stock.
- Now, it is essential for the user to reboot the device and boot it into the recovery mode.
- By following the above process, you need to run ADB shell on PC and make sure to rename the files displaying below.
- /system/lib/hw/power.msm8974.so.bak à /system/lib/hw/power.msm8974.so
- /system/bin/thermal-engine-hh-bak à /system/bin/thermal-engine-hh
- Install the OTA update zip through recovery
- Flash the latest SuperSU
You can easily install Custom ROM on any Android device without the help of PC with this article. Read More: How to Install Custom ROM on Android Without PC [Best Guide 2018].
Fix status 7 Error while Installing Custom ROMs
People who are facing the issues like getting the status 7 error when it comes to installing CM update.zip package or custom ROMs. If you see the status 7 error while installing a custom ROMs, then follow the below steps to fix it.
- First you need to download the latest TWRP/PhilZ/CWM recovery for the device and flash it by using custom recovery or ADB.
- If you are facing the issues like an error while flashing the ROM is CWM, you can now try it to switching to the recovery TWRP/PhilZ, and then the status will be fixed.
Generally, most of the time Status 7 error will appear during the time of ROMs updater-script which tries to check the model of a device which is compatible with ROM that you are installing. Asserts are there in the updater-script which is said to be the specific part. By just removing asserts from the script, you can make a way to bypass the check that executes in status 7 errors. However, ROM developer would like to do device model according to the changes to the script. Here, let’s have a look that how the changes to the updater-script.
- At first, you need to copy the ROM file to desktop and make sure to unzip it.
- After the process of unzipped, move towards META-INF/com/google/android directory.
- Now, you can see the two files such as updater-script and update-binary.
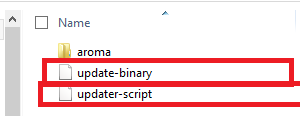
Update binary and updater script files
- You need to add “updater-script.txt” as a new name of updater-script file and then open it in a text file editor.
- You can now remove the lines from “assert” to immediate next “semi-colon.”
- By removing assert, you need to save the changes and close the text editor.
- Now, again rename the updater-script.txt with updater-script
- Make sure to get back to ROM folder and choose all the files by just pressing Ctrl+A.
- Then, you need to compress it to Zip.
- You can copy the zipped ROM file to the device and install it without any hassles.
- Finally, you are ready to install ROM file without getting a status 7
Conclusion: Fix Status 7 Error When Install Custom ROMs and OTA Update
People who all are facing the issues when it comes to flashing or sideloading the new update by getting status 7 errors, then the above process will be helpful. By following the above stuff, you can fix the issues without any delay.
- [How To] Install Substratum on Galaxy S9/S9+ Without Root.
- Access Google Lens without Root on Any Android Smartphone.