
Customize Xiaomi Mi A1 dual Camera watermark using Magisk Module
Xiaomi is the well-known player in the smartphone industry. Despite having been in the business for just 4 years, Xiaomi has gained lots of popularity from all over the world. The growth of this electronic and software company is rapidly increasing with the fast rate in the Asian market. The Xiaomi Mi A1 is the first Xiaomi device that is powered by Android One program. This mobile phone is mainly popular in the market for its dual camera setup which shot amazing photos. The other reason is it’s is powered by the Google’s stock Android operating system.
Though the camera is perfect for photo enthusiasts, there is a problem of watermark that some people don’t like. By default, the camera engraves “Shot by Xiaomi Mi A1 Dual camera” watermark on every photo. It is possible to turn off this feature, but there are people who would like to change the watermark message, which is not possible through regular means. If you are one of these people who want to customize the watermark then, read this full article. Here in this post, we will talk about how to customize Xiaomi Mi A1 dual camera watermark using Magisk Module.

Firstly, you have to unlock the bootloader of Xiaomi Mi A1 to install a custom recovery. You can search the web on how to unlock the bootloader of Mi A1. Once you unlock the bootloader of your Xiaomi Mi A1 then, the process to next. Now, you have to install a custom recovery on your Xiaomi Mi A1 to customize Mi A1 dual camera watermark using Magisk Module.
Contents
How to install a custom recovery on Mi A1 [Steps]
1: At the first step, you have to download TWRP on your computer.
2: Now, you have to click on connect your Xiaomi Mi A1 to the computer via USB cable. Transfer the recovery image file to the mobile phone.
3: Once the above process completed, boot your Mi A1 into fastboot mode. Firstly “Power off” your mobile device and press “Power” button and “Volume Down” button simultaneously.
4: Then, copy the custom recovery image file to the “adb and minimal folder”.
5: Double-click on the “adb and minimal folder” to open. Right-click on the white space and choose “Open command prompt window here”.
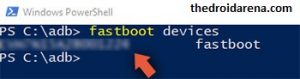
6: A black command prompt window will appear. You can give it instruction by typing commands. Type “fastboot devices” without quotes and press “Enter” button.
7: Now, it will show the ID of the device if it is connected to the computer. If your device is not connected to the computer then, it will empty space or error.
8: This step is very important, type “fastboot boot recovery -3.x.x.x.img” and press enter button. Here “x” represent the custom recovery version, you can enter as per custom recovery that you are flashing.
9: Once the above process completed, your device will automatically reboot into the TWRP recovery mode. Don’t worry if your device doesn’t boot into TWRP recovery. You can do it manually by pressing “Volume Up” and “Power” button simultaneously.
10: Now, tap on “Install” button and choose the file that you have transferred to your mobile phone in step 2.
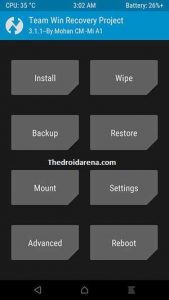
11: Swipe to flash the TWRP recovery.
12: Finally, tap on “Reboot” button.
Once the TWRP is successfully installed on your Xiaomi Mi A1 then, you can flash Magisk Manager. Magisk is a root manager tool with loads of features, unlike Chainfire. This tool is developed by Topjohnwu the senior XDA developer. Getting engaging with Magisk, you can customize your mobile phone. Modules in Magisk Manager make it better than other root manager tool. The community of Magisk is very active that develop helpful tools. If you have Xiaomi Mi A1 then, this is a great tool for you.
How to Flash Magisk Manager?
With Magisk, you can easily customize Xiaomi Mi A1 dual camera watermark. Here below are steps on how to install Magisk on Mi A1
1: Initially, you have to download Magisk Manager Zip file from their official website. Place the file on the internal storage of Xiaomi Mi A1.
2: Go to TWRP custom recovery by pressing Volume down and Power button at the same time for 5 to 6 seconds.
3: Now, you have to tap on “Install” button and locate the Magisk Manager Zip file.
4: Then, tap on the Zip file and swipe to flash the Magisk on your Xiaomi Mi A1.
5: Hit on “Reboot System” button.
You can easily tweak your android device as you wish with the help of Xposed Framework and its modules. Read More: Download and Install Official Xposed Framework on Android devices.
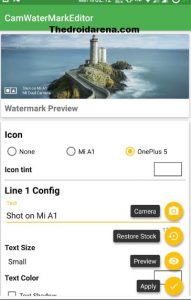
How to customize Xiaomi Mi A1 dual camera watermark using Magisk Module
1: Firstly, install the Mi A1 camera watermark editor app on your Xiaomi Mi A1 device.
2: Tap on the Mi A1 camera watermark editor app icon to open it. Tap on “Allow” to grant the storage permission.
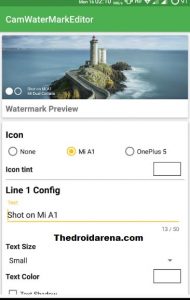
3: Now, you have to tap on the icon to choose the icon color.
4: Once the above process completed, you have to type the line 1 text – Select the size of line 1 text and then, set the color.
5: Tap on Disable text shadow and set the settings if you want.
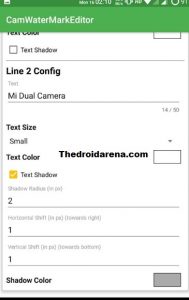
6: You have to repeat the step 3 and step 4 to set line 2 properties.
7: If the above process completed, one can preview the watermark by tapping on eye icon under the float button.
8: Tap on “Apply” button to save changes. That’s it.
Must Read: How To Install Lucky Patcher APK on Android [With Root/Without Root].
Conclusion: Customize Xiaomi Mi A1 dual Camera watermark using Magisk Module
So this is the way how we Customize Xiaomi Mi A1 dual Camera watermark using Magisk Module. Hope this clears up and if you have got any further doubts, just shoot it down through the comments and we will reply you at the earliest.
Read the following articles:
- [How To] Download and Install ViPER4Android on Android without Root.
- Download and Install Game Killer App Apk on Android Mobiles/Tablets.
One thought on “Customize Xiaomi Mi A1 dual Camera watermark using Magisk Module”