
[How To] Create & Restore Nandroid Backup on Android Devices
Creating a secure backup before installing any of the Custom ROMs is very much necessary in order to do recovery process for getting it back. If we talk about custom recovery; TWRP is one of the most popular custom recoveries for your android phone. You will get detailed information about how to create & restore Nandroid backup on Android Devices here in this content.
We all know that Android operating system is an open source which enables you to customize your various applications for accessing them. One of the easiest tricks to gain access to such apps is to root or install custom ROM. One of the best features of custom ROM of your Android handset is Nandroid backup which offers you the facility of restoring your data anytime you need.
Contents
What is Nandroid Backup?
Meaning of the Nandroid Backup is there in its name. Word “NAND” itself means the flash memory which is the permanent memory of the Android device. Nandroid backup is a secure backup for the entire files off your smartphone using the kernel, themes, apps, app data, messages, call logs, device settings and much more. It means that it enables you to get back all of your data once you restore it. Nandroid backup mainly depends upon to custom recoveries for backing up your data; TWRP, CWM and Philz.
You will get the detailed information about creating a Nandroid backup using TWRP Recovery as well as CWM Recovery here in this content.
How to Create and Restore Nandroid Backup on Android Devices [STEPS]
TWRP Recovery
- For starting the recovery process, the first thing you need to do is to boot your Android handset into the TWRP recovery mode.
- Once you have done with it; now go to the main menu of your Android handset and the press the Backup option to enter into the “backup”.
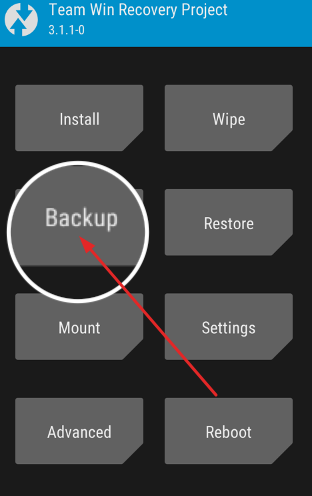
Tap on Backup from the main menu of TWRP
- Once done; you see the available partitions to backup.
- Start the partitions from the provided list of options to continue with the process. Don’t forget to add partitions Boot and System into the list as they are the essential ones which you can’t ignore at all.
- On the successful completion of the above process; now swipe right on your Home Screen to start the Nandroid backup process.
- That’s all done with the process. The backup for your Android device using TWRP Recovery has been done
- You can now enjoy accessing restore data by restoring the Nandroid backup. For this; go to the main menu of TWRP and then select the restore option from the given options.
- Once done successfully; now select the Nandroid partitions you wanted to restore for.
- Swipe right to start the restoring process.
- On the successful completion of the restoring process; don’t forget to reboot your device for the proper functioning of your Android handset.
You can easily tweak any android applications using lucky patcher by the following article. Read More: How To Install Lucky Patcher APK on Android [With Root/Without Root].
CWM Recovery
- Start the Nandroid backup process by booting up your Android device into the CWM Recovery mode.
- Once done; go to the main menu option now and then press the Backup and Restore option so that to enter the backup process.
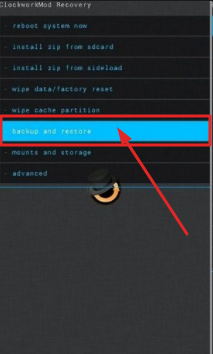
Backup and Restore on CWM Recovery
- On the successful completion of the above process; you are now able to see various sub-options on your screen now; select the Backup option from there and then select internal or external memory options.
- Make a backup and then wait for the process to be completed.
- Once done; you will get notified of a prompted message.
- Now, if you are looking for restoring your data back through Nandroid backup; go to the Restore and Backup option of your device.
- Now select any restore option from the internal or external memory of your smartphone from the above sub-menu where you actually are willing to restore your data.
- Start the restoring process and wait for its completion. It will take a few seconds to get completed.
- On the successful completion of restoring process, you can view all your data back which you have lost earlier. But before accessing any app on your handset after restoring data don’t forget to reboot your device to ensure the proper functioning of all the apps properly.
Philz Recovery
Creating and restoring Nandroid backup on Android devices using Philz is similar to the process of CWM.
- First install Philz recovery on your Android Device.
- Next Press volume down+Power Button to enter into Philz Recovery mode and click on “Backup and Restore” option from main menu.
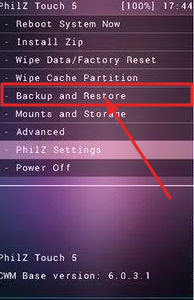
Backup and Restore on Philz Recovery
- Now you need to select “Backup” which you can find under “Sub Options”. Select internal or external memory to keep backup files. Next tap on “Backup.”
- After few seconds, the backup process is finished.
- For restoring the Nandroid Backup, go back to “Restore a Backup option”, choose either internal memory or external memory as restore option. Next Tap on “Sub option” and select “Restore.”
- After completing restoring, reboot and go to the stock Android OS.
Conclusion: Create & Restore Nandroid Backup on Android Devices
If you were in the doubt of creating and restoring the Nandroid backup, hope the given stuff will be useful at any time. With the help of two recoveries, you can now easily create the Nandroid Backup as per the given instruction.
Read more:
- [How-To] Root & Install Custom Recovery on HTC U12.
- [How To] Install Substratum on Galaxy S9/S9+ Without Root.