How To Root Xiaomi Mi A2 and Install TWRP recovery [Guide]
Last month, Xiaomi finally launched its Xiaomi Mi A2 in Spain the successor to Mi A1. Mi A1 has gained lots of appreciation from smartphone users worldwide due to its hardware and Android One program. Like its predecessor Mi A1, Xiaomi Mi A2 also runs on Google’s Android One project i.e. you will get software upgrade support for many years. Xiaomi Mi A2 brings loads of new hardware and software changes. This handy device is powered by Qualcomm’s Snapdragon 660 chipset with 6GB/4GB RAM. In simple words, it is a powerful and great phone for both users and developers.

Have you recently bought a brand new Xiaomi Mi A2 and want to install TWRP recovery on it? Well, you are one of those users who are always in the search of unique and special features. It is well known fact that you can add additional functions to your smartphone by rooting, installing custom Recovery or ROMS. For the past couple of years, installing the custom ROMS and recovery has become quite a common practice among tech geeks. In this post, we are going to give you a complete step-by-step guide on how you can install the TWRP and root Xiaomi Mi A2. But, before proceeding to the guide let’s learn about TWRP.
TWRP aka Team Win Recovery Project is an open source software custom recovery for Android devices. Getting engaging with TWRP, one can easily install third-party apps at the system level. One of the major benefits of having TWRP like custom recovery on a smartphone is that you can install Custom ROMS on your device.
Must Check: Install Xiaomi Mi A2 Camera Port on Redmi Note 5 Pro [GUIDE].
Contents
Install TWRP recovery and root Xiaomi Mi A2 | Requirements :
All the following points you must have to take care before installing TWRP and root Mi A2.s
- Make sure your Xiaomi Mi A2 bootloader is unlocked. If you don’t know how to unlock the Bootloader then, follow this post How To Install TWRP Custom Recovery on Android Devices [Complete Guide].
- Charge your phone at least 70 percent so that it doesn’t get turn off during the installation process.
- Download and install the ADB fastboot and minimal on your computer.
- Xiaomi Mi A2 device driver is also required to install TWRP Xiaomi Mi A2.
- You have to download the TWRP recovery for Xiaomi Mi A2 and place it inside the ADB & Minimal folder.
- Make sure to take proper backup of your device in order to avoid data loss.
- Download the Magisk zip file that will root your Mi A2 device.
- Download DM verity disabler to prevent the device from bootloop.
Must Read: Install Xiaomi Mi A2 Camera Port on Redmi Note 5 Pro [GUIDE].
How to install TWRP recovery and Root Xiaomi Mi A2? [Steps]
You can follow the below steps if you have successfully unlocked the bootloader of Xiaomi Mi A2.
- First of all, you have to connect the Xiaomi Mi A2 device to the computer by using USB type C cable.
- Now, you have to transfer all the downloaded file including TWRP, Magisk zip file, DM Verity disabler to the root folder of your Mi A2.
- After that, you have to enable the USB debugging by going to the device Settings > System > Developer Option > Enable USB Debugging. If developer option is not visible then, go to System > About Phone > Tap 5-6 times on build number.
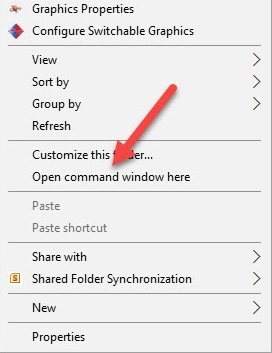
- Now, open the ADB fastboot & minimal folder and right click on the empty area to choose “Open Command window here”.
- Type below command and hit the “Enter” button. If any permission dialogue box appears with the messages “Allow USB debugging” on the mobile screen then, tap on “OK” button.
abd reboot bootlooader
- Now, you have to install the TWRP recovery on Xiaomi Mi A2 by simply type the following command and hit on the Enter button.
fastboot flash boot_b recovery.img
Note: In this command, recovery is the TWRP recovery file name followed by file extension .img.
- After that, you have to set the Partition B as an active partition by entering the following command.
fastboot set_active b
- This step is very important, hold the volume up button and run the following command while holding the volume up button.
fastboot reboot
The above command will reboot your device into recovery mode.
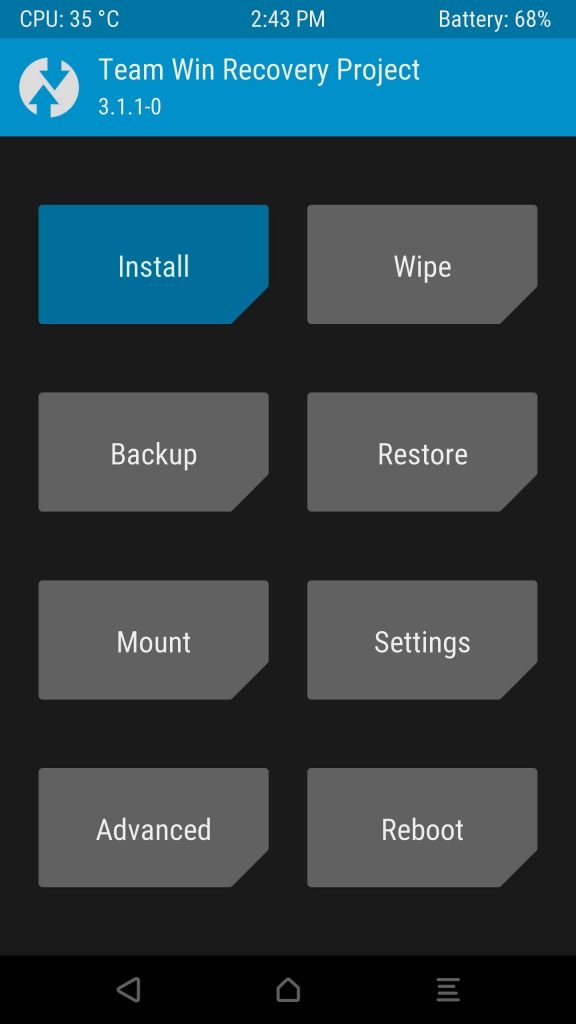
- Once the TWRP interface will appear, tap on the install button and flash the TWRP installer to completely install the TWRP recovery.
- Now, tap on the “Install” button and navigate to the Magisk.zip file.
Tap on “Install”
- Select the Magisk.zip file and confirm to flash Magisk on the next screen.
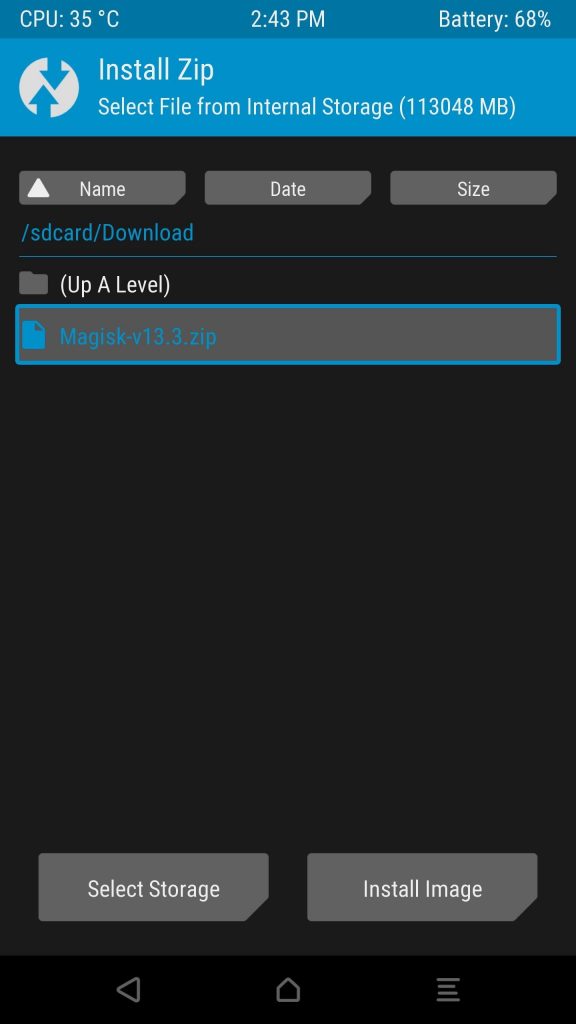
Select Magisk.zip
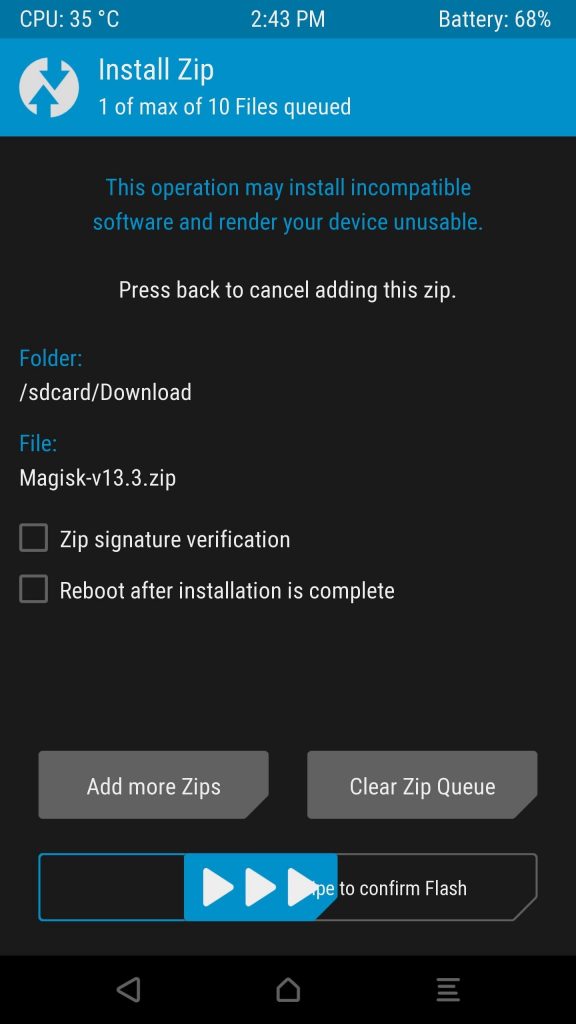
Swipe to confirm flash
Note: If you don’t want to root your Xiaomi Mi A2 device then, you can install the DM verity disabler to avoid boot problems like bootlooping.
- Once the above step is successfully completed, it’s time to reboot the device. Tap on the Home button > Reboot > and activate the Slot A.
Congratulations, you have successfully installed TWRP and root your brand new Mi A2. You can check the root access by installing third-party root checker app or by using Magisk safety check.
Also Check: How To Root & Install TWRP Recovery on Asus Zenfone 5Z [Tutorial].
Conclusion: How To Root and Install TWRP Recovery on Xiaomi Mi A2
So, this is the complete step by step guide on how to install TWRP recovery and root Xiaomi Mi A2. Hope, you have understood the above guide. If you still have any doubts or suggestion then, feel free to ask us the same in the comment section below.
You may like to read the following posts:
- Download and Install LineageOS 15.1 for Xiaomi Mi A1 (Android 8.1 Oreo).
- [How-To] Install Ported OnePlus 5T Camera on Xiaomi MI A1.