
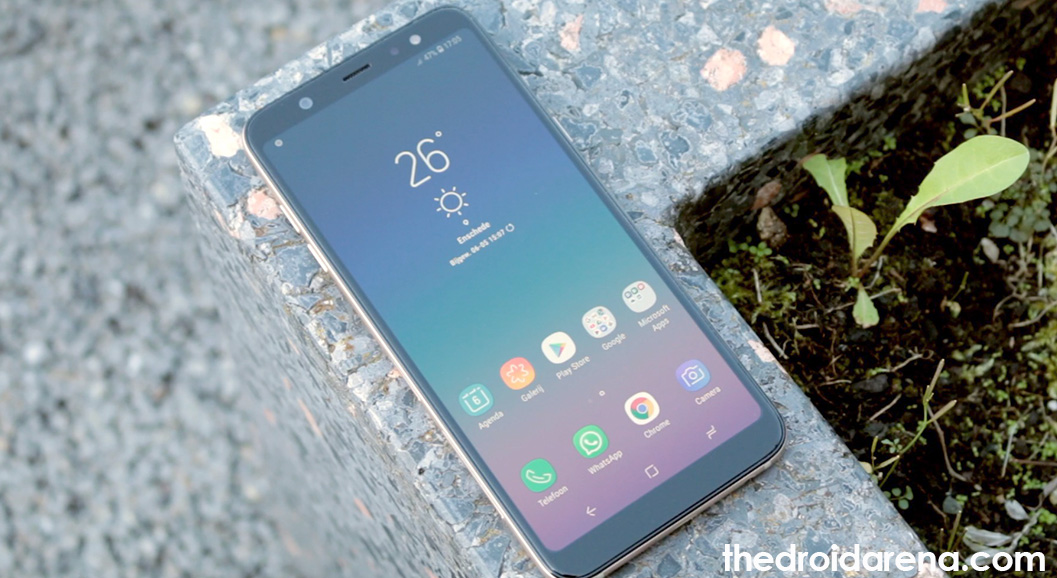
How To Root & Install TWRP on Samsung Galaxy A6
The standard Samsung Galaxy A6, though doesn’t supports cool features and hardware specs as compared to the Redmi Note 5 Pro and Moto G6, but good news for the A6 owners is that they can proceed with rooting their Samsung Galaxy A6 as, thanks to the efforts put in by XDA Member BlackMesa123, the TWRP Recovery for Galaxy A6 is available. However, only the standard A6 is supported by this process so, we are sorry, A6+ owners have to wait for some more time.
Do see: Download & Install Resurrection Remix ROM on Galaxy S9/S9 Plus
Please note that you mustn’t proceed with the process detailed in this guide if you are not clear with what each step does. If your device suffers any kind of hardware or software damage, we won’t be responsible for that. Also, reiterating the statement said in the beginning, the process and the associated files are compatible only with Samsung Galaxy A6, code name a6lte and mode number A600. If you try the files on some other device you are most likely to get your device bricked.
Contents
Root Samsung Galaxy A6 | Prerequisites
- First and foremost, please install ADB & Fastboot on your PC.
- Please Download and install Samsung USB Driver on your PC.
- USB Debugging and OEM Unlock must be enabled on your Galaxy A6. You can get the same enabled from Developer Options in Settings.
- Also, don’t forget to take a Backup of your essential data using the Best Backup Apps for Android listed here.
[Important*] Your Device Must Not be RMM Locked
For the process to work your device must not be RMM Locked. If your device clears the below-mentioned points then it means it isn’t RMM Locked.
- Reboot your device in download mode and if the text RMM State = Prenormal is visible then it means your device is RMM Locked.
- If you don’t get to see the OEM Unlock option under Developer Options, post activating the same, then it means your device is RMM Locked.
- When attempting to boot into recovery mode your device flashes a message that ‘Only official released binaries are allowed to be flashed’ it again means that your device is RMM Locked.
Also check: Root LG G7 ThinQ Smartphone Using Magisk
Install TWRP Recovery on Samsung Galaxy A6 [STEPS]
- First of all you need to make sure that you have covered the prerequisites section present above and your device is not RMM Locked.
- Thereafter, please download the following files:
- Next, extract the Odin ZIP file and tap on Odin3 v3.13.1.exe. The Odin window will open up.
- Now, you require booting your Galaxy A6 into download mode:
- Switch off your Galaxy A6.
- Press and Hold Volume Up + Volume Down + Power Button together until the Warning Screen is visible.
- Next, press Volume Up for continuing into download mode.
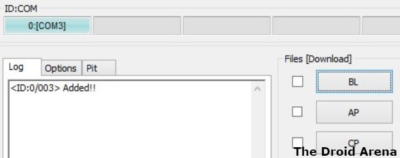
- Now, Connect your Galaxy A6 to PC using USB. Your device will be recognized by Odin. As a confirmation for successful recognition ‘Added’ message will appear in the Log Box in the bottom left. Moreover, the first box under ID:COM will also show a number and its background color will turn blue. If Odin doesn’t recognize your device then you need to reinstall the drivers and check again.
TWRP Recovery Installation Steps for Galaxy A6
- Please load the TWRP file onto Odin once your device is successfully recognized. For that click on AP button and load the TWRP file which you downloaded above.
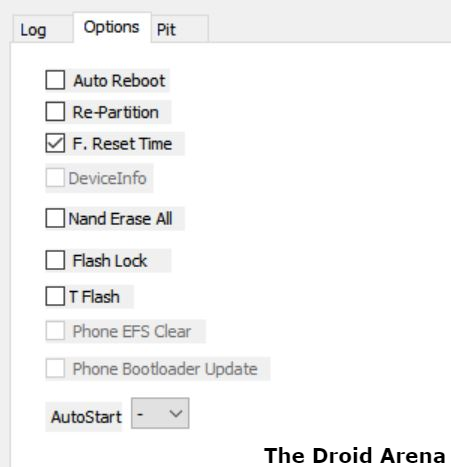
- Under the options tab in Odin, you need to make sure that re-partition and auto-reboot check boxes are not selected. Also, it is not recommended to use the PIT Tab.
- Tap the Start button on Odin and TWRP Recovery installation will start. Upon successful installation you will receive a Pass message.
- Follow the entire process again from the beginning if Odin gets stuck at Setup Connnection.
- If you get a FAIL message then flash the TWRP file again.
- Now since we have unchecked the Auto Reboot option your Galaxy A6 will remain in Download Mode and won’t restart automatically. Hence, now you need to force reboot into recovery mode.
- Press and hold Volume Down + Power Button together until the screen shuts down. Immediately, after the screen shuts down, press Volume Up button along with Power Button still pressed to reboot in recovery mode.
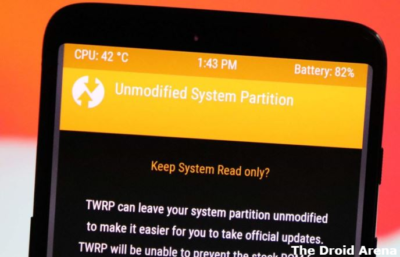
- Now your device will boot into TWRP recovery. When asked for ‘allow system modification‘ don’t do that. You require tapping on ‘Keep Read Only‘ button.
Also go through: Root & Install TWRP on OnePlus 5T on Android Oreo
Root Samsung Galaxy A6 [STEPS]
- For rooting Galaxy A6 you will need the latest Magisk file as well along with the DM Verity Disabler and RMM Bypass files which you have already downloaded above.
- Reboot into TWRP Recovery. For that shut down your device and press and hold the Volume Up + Power button together to reach TWRP.
- You require wiping the data partition now.
- For that please select Wipe from the TWRP Menu and select the ‘Format Data‘ option.
- On the next screen click on ‘Yes‘ and this will delete everything on your device.
- That’s why it is required that you have a complete backup of your essential data beforehand.
- Now, by pressing Home Button and reboot; please reboot your device into TWRP Recovery once again to make the Data Partition mountable.
- Transfer the Magisk File, DM Verity Disabler and RMM Bypass file to your device through USB.
- Tap the ‘Install‘ button from TWRP and select the DM Verity Disabler file. Swipe to confirm flash.
- Please do the same with the RMM Bypass file.
- Tap the ‘Install‘ button from TWRP menu and select the Magisk file. Swipe to confirm flash.
- Please install the RMM Bypass file once again.
- Next, from the home page of TWRP please tap on Reboot -> System to restart your Galaxy A6.
- Congratulations! You have successfully rooted your device.
Root & Install Custom Recovery on Samsung Galaxy A6
So, this was the process to root and install TWRP on Samsung Galaxy A6. For any kind of confusion or doubts please use the comments section below.
You might like to read the following posts:
- How To Unbrick OnePlus 6 from a Hard Brick.
- Install Lineage OS 15.1 on OnePlus One (Android 8.1 Oreo).