
[How-To] Replace Kingroot with SuperSU in Android [GUIDE]
Rooting is very common practice nowadays as everyone wants to customize their devices as per their needs. There are many apps that users can use to root their Android devices like SuperSU, KingoRoot, Magisk, Kingroot etc. SuperSU is one of the most popular rooting apps but people also try other apps for rooting their Android devices.
All apps perform the same function i.e. unlocking the root access. But where the function of all apps is the same, some apps perform better than others as can be seen in the case of SuperSU and Kingroot. While SuperSU is the most effective method to root Android devices, users of Kingroot have reported some errors while using the Kingroot’s Kinguser root manager.
Sometimes the Kinguser fails to provide permission to various apps on some devices. Moreover, Kingroot isn’t a trusted rooting app like SuperSU. Users don’t want to give permission to an app which can’t be trusted to access all features of their devices. This has caused users to shift from Kingroot to SuperSU. If you are among those users, you can learn how to replace Kingroot with SuperSU in Android.
Contents
Prerequisites for replacing Kingroot with SuperSU
Replacing Kingroot with SuperSU is one of the trending topics these days. If you also want to remove Kingroot app from your Android device and install SuperSU Android root in its place, there are some requirements that you need to meet first. There are –
- A rooted Android device on which you want to replace the Kingroot with SuperSU.
- Replace Kinguser with SuperSU zip file. Download from here.
- Terminal Emulator on your device.
- Zip files extractor like WinZip or ES File Explorer.
Must Read: Best 15 ADB & Fastboot commands list for Android [Windows/Mac/Linux].
Methods to replace Kingroot with SuperSU in Android
After meeting all these requirements, you are ready to replace Kingroot with SuperSU on your Android device. You can follow the below methods to replace the Kingroot app with SuperSu on your Android smartphone.
Method 1: Replacing Kingroot with SuperSU using the SuperSU app
If you want to remove the Kingroot from your Android device and install SuperSU in its place, then you can just install the SuperSU app on your device and uninstall Kingroot app. It is one of the easiest methods to replace Kingroot with SuperSU. Follow the below steps to perform the replacing task –
- Launch the Google Play Store on your device and look for the SuperSU from the search box.

Install SuperSU from Play Store
2. When found, install the SuperSU app on your device.
3. After installing the app, open the app and give permission to it as Superuser.
4.Then, Uninstall the Kingroot and update the Superuser Binary.
5. At last, reboot your Android device to finish the transition process.
This method is the simplest method to replace Kingroot with SuperSU in most of the Android devices. But sometimes this method fails to produce the desired results. So, you can follow the next method to replace the Kingroot with SuperSU for the desired outcome.
Do you want to root your device easily without a PC? Read More: Root Android Phone Without Computer or PC [ Latest Working Methods ].
Method 2: Replacing Kingroot app with SuperSU using Terminal Emulator
This is the most trusted and effective method to replace Kingroot with SuperSU which works perfectly on most Android devices. You need terminal Emulator on your device to use this method.
- Download and install “Terminal Emulator” on your Android device from the Google Play Store.
- Next, you need to download the Replace Kinguser with SuperSU zip file and extract it in any folder of your device storage with the help of WinZip or other file extractor apps.
- Launch the Terminal Emulator app and enter “su” command in its terminal.
- When asked for permission, allow all permissions to it.
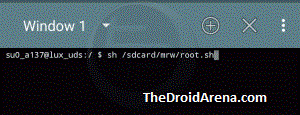
- After granting permissions, you have to type another command “sh /sdcard/mrw/root.sh”. An error message will be displayed on the screen which you just have to ignore it.
Enter command in the terminal
6. Wait for some time as the emulator is running some scripts. It will automatically start the SuperSU app afterward. If it doesn’t, open the app from the App drawer of your device.
7.Tap “continue” when asked to update Superuser binary and then select the “Normal Mode”.
8. Then, you just need to restart your device and the Kingroot will be replaced by SuperSU when it boots up again.
That’s it. You have successfully replaced the Kingroot app with the SuperSU on your Android device. This is one of the most successful methods to perform this task. But this method carries the risk of bricking your device if not performed perfectly. So you can follow the next method to replace Kingroot with SuperSU.
Method 3: Replacing Kingroot with SuperSU using SuperSU Me Pro app
This one is another simple method to replace Kingroot with SuperSU using the SuperSU Me Pro app. You don’t need to perform any coding or enter tricky commands to apply this method.
- Download and install the SuperSU Me Pro app from here.
- Launch the app and grant permission to it when prompted.
- Click on the big Android button that you see after launching the app.

Click the Big Android button
4. It will start replacing Kingroot with SuperSU. Wait for a few minutes and the SuperSU will be automatically launched on your device.
These are the three methods by which you can replace Kingroot with SuperSU. You will be able to successfully replace the Kingroot with SuperSU by following any of the three methods.
Read More:
- [How To] Recover Wifi Passwords on Android Device Without Root.
- How to edit Build.prop file without rooting your device [Tutorial].