
Root and Install Custom Recovery on Android P (9.0) Devices [TUTORIAL]
Android is a leading mobile operating system with over 80 percent of market share. This is an open source operating system that is designed by Google Inc. The Android operating system most anticipated mobile OS that attracts millions of fans throughout the world during a new launch. There is no doubt that Google keeps its Stock Android in Tip-Top Shape. The main reason behind the popularity of Android OS is its flexibility and easy customization. Android version 8.1 (Oreo) is the latest Android version of Google. Nevertheless, Google is testing the successor of Android 8.0.

Recently, Google has released the developer preview of Android 9.0 aka Android P for its Pixel devices. Currently, it is in alpha stage for testing. This version of Android brings some noticeable changes from UI improvement to software optimization. If you are using Android P and want to root then, you have come to the right place.
Rooting is the process by which you will be able to access to modify or customize the codes of the software of your Android phone that manufacturing company does not allow you to do. In this article, we will learn about how we can root Android P 9.0 devices. So, let’s learn about rooting the Android P 9.0 Devices.
Contents
Requirements to Root Android 9.0
- In order to root Android P 9.0, you have to enable Developer Option under the settings.
- After that, one needs to enable OEM to unlock which is available under the Developer option.
- Now, enable USB debugging which you can also find under Developer Option and perform an Advanced
- Download and install ADB and Fastboot on your computer.
- You have to download official TWRP for your Pixel device from the official website of TWRP.
- Download Magisk 16.1 zip file.
Your Google Pixel device bootloader must be unlocked in order to flash a custom recovery on it. You can search on the web to know how to unlock the bootloader. After bootloader successfully unlocked, now it’s time to install a custom recovery. Here, we are using TWRP custom recovery on Android P device.
Here is the most simple way to install TWRP custom recovery on any android device. Read More: How To Install TWRP Custom Recovery on Android Devices [Complete Guide].
How to Install a custom recovery on Android P device [STEPS]
1: First of all, place the Recovery.img file on the ADB and Fastboot folder without extracting it.

Place Recovery image file into ADB and fastboot folder
2: Now, you have to connect your Google Pixel device to the computer via USB type C to Type A cable.
3: Then, you have to hold “Shift” key and right click on the empty area to open a command prompt within ADB and Fastboot folder.
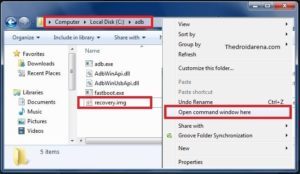
Open command prompt within ADB and Fastboot folder
4: You need to reboot your Pixel device in bootloader mode. You can do so by holding “Power” and “Volume down” key simultaneously.
5: On the command prompt, you have to enter “adb reboot bootloader” without quotes and press “Enter” button.
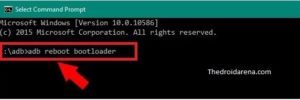
Type adb reboot bootloader
6: Type “fastboot devices” and hit Enter button.
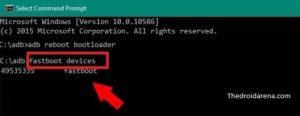
Type fastboot devices
7: To boot TWRP image, you have to type “fastboot boot recovery.img” and press “Enter”.
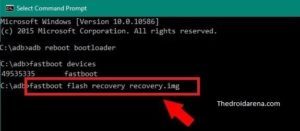
Type fastboot boot recovery.img
8: Now, you have to wait for a couple of seconds to get process complete. After that, disconnect your phone from the computer.
Now, it turns to root Android P using Magisk manager. So, what is Magisk?
Magisk is the systemless root manager tool that is coded by Topjohnwu – The senior XDA developer. This tool allows the user to root any Android device in few steps. It is not limited to root, one can also use this tool to modify the software of Android device. This is one of the best alternatives of SuperSu from Chainfire which was the first choice of any developer.
How to Root Android P device [STEPS]
1: First of all, transfer Magisk.zip file to the internal storage of your device and reboot the device into Recovery mode.
2: Once recovery mode will appear, you have to tap on “Install” button at the top left.
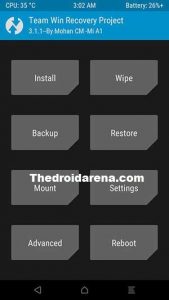
Open TWRP recovery
3: Now, you have to navigate to the file and tap on Magisk.zip.
4: TWRP will ask you for confirmation, simply swipe on “Swipe to confirm”.
5: It will take some time to finish root process with Magisk.
6: Tap on “Wipe Cache/Dalvik” and reboot your device.
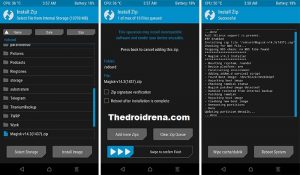
Flash Magisk.zip file to root
Congratulations, you Android P device is successfully rooted!
Must Read:Download Latest GBWhatsApp Apk on Android Devices Latest.
Conclusion: How to root and install custom recovery on Android P 9.0 (P) Devices
Android is popular amongst its fans since its inception. Customization is the main reason behind its popularity. So, Android P users who are seeking to know how to root Android P can read the above article carefully to root your Android 9.0 (P) device. This article contains steps by step guide that is easier to understand and implement. There is no special computer knowledge is necessary to perform. This is the most updated methods to root latest Android 9.0 version. Still have any query? You can comment down below.
Read More:
- How to Hack Android Games Without Root[Best Game Hacking Apps].
- [How To] Recover Wifi Passwords on Android Device Without Root.
3 thoughts on “Root and Install Custom Recovery on Android P (9.0) Devices [TUTORIAL]”