
How To Switch from SuperSU to Magisk [Complete Guide]
SuperSu is the most famous rooting solution for Android devices, but there is another tool is available that is Magisk. These two tools come with some pros and cons, but the most important thing about Magisk is it offers magisk modules along with a rooting solution. Today we will show you how you can switch from SuperSu to Magisk without any hassle.
Magisk is becoming popular gradually as a rooting tool and users are getting its updated versions often because developers are working hard on it constantly. Even the different mobile manufacturing companies which bring their products to Android platform, try to make the device Magisk compatible. Sometimes, SuperSu users complain that after installing this Rooting application, it badly affects the Xposed framework. But when you for the Magisk, it does not harm your system mods.

We all know that most of the Android users who root their device to enhance the Android experience, use SuperSu. At the same time many people looking for the way to switch from SuperSu due to its different Flaws. While you root your device with SuperSu, the phone gets uncertified and the apps which include monetary process stop performing. But when you use Magisk, it gives you the freedom you use all banking applications without any hassle. Magisk helps you to keep all the files and folders into systems partition and lets you install official OTA (Over-the-air) updates for any software on the rooting environment. Due to this streamlined behavior, people like to use Magisk over SuperSu.
Contents
Requirements to Switch from SuperSu to Magisk
- Custom Recovery is an important part of the Rooting Even when you decide for shifting SuperSu to Magisk, you also need any Custom recovery like TWRP, CWM, etc. Here we have used TWRP Custom Recovery. Follow the this article to install TWRP Custom Recovery on your Android Mobile.
- UnSU.
- Magisk.
- Magisk manager.
How to Switch from SuperSu to Magisk
Here we have brought the solution. Today you can get a method to switch from SuperSu to Magisk. This method is divided into 2 processes. First, you need to uninstall SuperSu from your device and next you will install Magisk on the same mobile.
How to Uninstall SuperSu from Your Android Device
- Download UnSU zip file, Magisk file and Magisk manager on your Computer and transfer those files to the external memory of your device.
- Then, reboot your device to TWRP Custom recovery by using Volume Down+ Power Button this sequence.
- After entering TWRP recovery, you need to click on “Install” You will see the UnSU zip file. Select it and swipe right for confirming flashing.
- After finishing the process, reboot your device to Android firmware.
By following above process, you will uninstall SuperSu, and your device will not be rooted. To check this install Root Checker application on your device.
How to Install Magisk on Your Android Device [STEPS]
- Hope you already transfer Magisk zip file to your device. Again reboot your phone to TWRP recovery and Tap on “Install” after going to the recovery mode.
- Next, find Magisk zip file and select it. Scroll down and swipe flash button to the right for installing it.
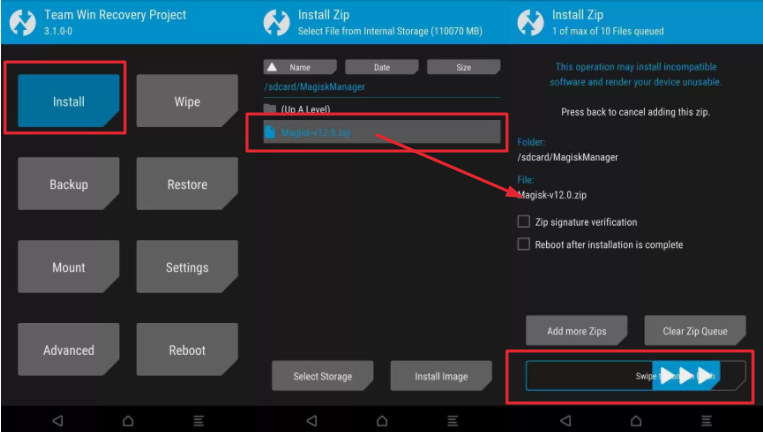
Flash Magisk file from Custom Recovery
- Next, go back to the Android firmware.
- Open the Magisk Manager folder and find the installer for launching it. Now run Magisk Manager.
Above we have provided a complete guide to switching SuperSu to Magisk. You use this tool without any hassle you need to enable some features within Magisk Manager. For this,
- Open the Magisk Manager on your mobile and allow BusyBox, Magisk Hide, and Systemless Hosts with swipe toggle to the right side for every option.
- Next, head back to “Status” and hit “SafetyNet Check.” In the next screen, you will see that you have cleared the check.
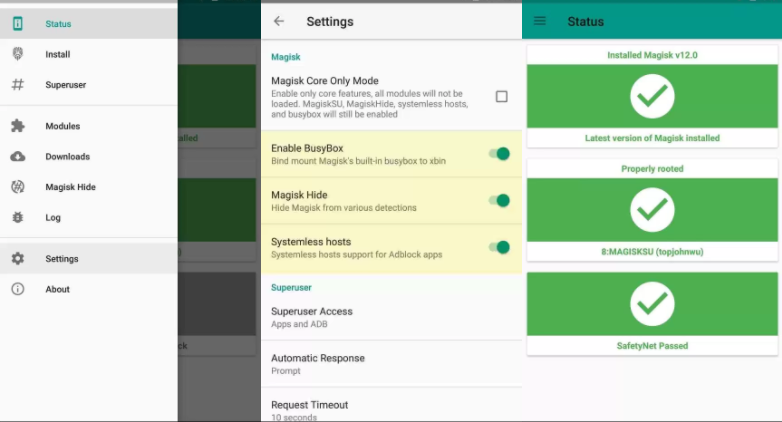
Enable different features on Magisk Manager
Now you have configured the Magisk perfectly. Sometimes Google PlayStore cannot recognize the status of “SafetyNet Check” after installing Magisk even after enabling magisk hide. As a result, you can find your device uncertified. To get rid of this problem,
- Head to “Settings” of your device and tap on “Apps.”
- Find Google PlayStore from the installed App list and tap on it.
- In the next screen, hit the “Force Stop,” “Manage Space” and tap on “Clear Data.”
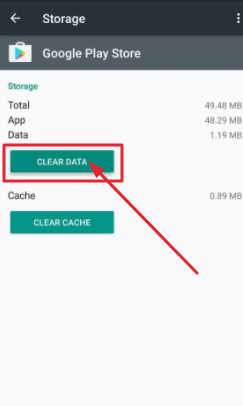
Clear Data for Google Play Store
- Next, open the Google PlayStore and hit the “Menu” option.
- A list will come from left. Select “Settings” from the list. Then scroll down to About, and you can see “certified” under “Device Certification.”
Now you feel relaxed that, Google certification remains same for your phone and you never hesitate to install any application on your rooted device. But to need to be conscious while go to install Apk files. Sometimes it changes the system files even the “SafetyNet Check” is “ON.”
Conclusion: How to Switch From SuperSu to Magisk
This is the complete guide to Switch from SuperSu to Magisk. Here we have added some additional information which can help you to perform with Magisk. If this article is useful for you, then please leave your valuable comment here.
You may like to read the following posts:
- How To Hide Root Access from Apps That Detect Root on Android.
- Hide Display Notch on Android Devices with Nacho Notch.
One thought on “How To Switch from SuperSU to Magisk [Complete Guide]”