
How To Unroot Samsung Galaxy S9 / Samsung Galaxy S9 Plus [Official Firmware]
Android users who love to root their devices tend to go on with the rooting procedure, immediately, as and when they get their hands on a new Android device. Rooting is done to liberate the Android device from the restrictions imposed by the manufacturers in terms of features, functionality and flexibility. However, in some cases, when rooting is not done properly or there is an issue with the application or mechanism used for rooting, users start to face defects, bugs and glitches in their device’s functionality. In this scenario there is no other option other than to unroot the Android device. In this post we are sharing with you the steps to Unroot Samsung Galaxy S9/S9 Plus using the official firmware from Samsung.

Must Read: Record Screen on Samsung Galaxy S9 & Samsung Galaxy S9+.
Talking about Galaxy S9/S9 Plus the smartphones are true monsters in terms of specifications. With Snapdragon 845 or Exynos 9810 CPU and 4 GB & 6 GB RAM respectively; both Galaxy S9 & S9 Plus have a fantastic amount of power and strength to give you a great experience. Before you proceed with the unroot procedure you need to take care of certain prerequisites and prepare your device for the process.
Contents
Unroot Galaxy S9 & Galaxy S9 Plus | Requirements
- Please note that this guide is meant only for Galaxy S9/S9+ and mustn’t be used for any other Android device.
- Since the method will wipe away the data present in your phone; it is essential that you take a complete backup of your device before proceeding ahead including contacts, messages, call logs etc.
- Battery level of your device must be 70% or more.
- If you have installed Samsung Smart Switch or Samsung Kies you require disabling both of them.
- On your PC; please disable the Anti-Virus as well as Windows Firewall.
- It is recommended that you use original USB Data Cable to connect your device with your PC.
- Please enable OEM Unlock as well as USB Debugging on your Galaxy S9/S9+.
- Download & Install Universal Android USB Drivers on your PC.
- You need to install the Latest Odin software on your PC.
- Last, download the Latest stock firmware for your Galaxy S9/S9+. Once downloaded extract it into AP, BL, CP & Home_CSC files.
How To Unroot Samsung Galaxy S9/S9+ [ STEPS]
- As a first please launch Odin on your PC.
- You will see the AP, BL, CP as well as Home_CSC tabs in it. Please upload the relevant component of the firmware according to their name onto their respective tabs.
- You require shutting down your phone now. Put it in ‘Download Mode.’ For that boot up your device by pressing Volume Down + Power + Bixby button. Your phone will display a warning. Immediately press the Volume Up key to enter into Download Mode.
- Establish a connection of your device with your PC using original USB.
- As soon as a successful connection is established the ID:COM box in Odin will turn blue.
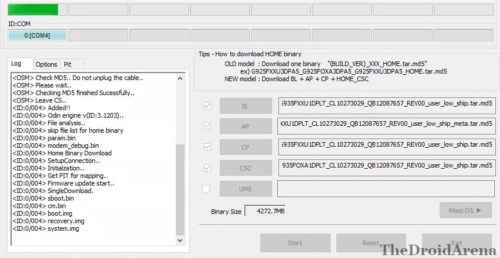
- Tap on the ‘Options‘ tab. Here please un-check all the options except F.Reset.Time & Auto Reboot.
- Cool! Now hit the Start button to flash the stock ROM onto your Galaxy S9/S9+.
- It won’t take more than a few minutes for the process to get over. Your phone will reboot automatically once the process is over.
- Once your phone boots up just disconnect. Congrats! You have successfully performed an Unroot on your Galaxy S9/S9+ device.
Conclusion: Easy Guide to Unroot Procedure for Samsung Galaxy S9 / Galaxy S9 Plus
So, this was the entire procedure to unroot your Samsung Galaxy S9/S9+ and flash stock ROM on it. In any case, if you have any doubts or additional questions to ask, please feel free to shoot them down in the comments section below.
Also check the following Galaxy S9/S9+ related posts:
- Get Google Pixel AR Stickers on Samsung Galaxy S9 or S9 +.
- Force Permanent Immersive Mode on Samsung Galaxy S9 &S9+.