
How to Root OnePlus 6 and Install TWRP Custom Recovery [OxygenOS 5.1.8, 5.1.7, 5.1.6, 5.1.5]
Root & Install Custom Recovery One Plus 6: One Plus 6 is the latest entrant in the series of One Plus Phones. With design pretty similar to the iPhone X; One Plus 6 is all set to take over the smartphone market with a breeze. We bring this post, for advanced Android users, to share the process to root and install custom recovery on One Plus 6. This Tutorial on How To Root OnePlus 6 is updated with OxygenOS 5.1.8, 5.1.7, 5.1.6, 5.1.5 as of now

Contents
How To Root and Install TWRP Custom Recovery on OnePlus 6 [Method 1]
Before you begin the process to root your OnePlus 6 smartphone please ensure that you have covered the following prerequisites:
- ADB & Fastboot drivers must be installed on your PC/Laptop.
- Please enable USB Debugging & OEM Unlock for your OnePlus 6.
- Take a complete backup of all the essential data before proceeding.
- The bootloader of your OnePlus 6 must be unlocked.
- The battery level of your device must be at least 70% to prevent accidental shut down
For enabling USB Debugging & OEM Unlock please navigate to Settings -> About Phone -> Build Number and tap on the Build Number about 7 times until Developer Options get activated. USB Debugging, as well as OEM Unlock, will be present in Settings -> Developer Options.
Once, you are all set with the prerequisites to move ahead towards the procedure to root OnePlus 6.
Install TWRP Custom Recovery & Root OnePlus 6 [STEPS]
Works on OxygenOS 5.1.8, 5.1.7, 5.1.6, 5.1.5
- Reiterating the point that Bootloader of your OnePlus 6 must be in the unlocked state before you can start the rooting procedure.
- Please download OnePlus 6 ZIP file from the provided link. This ZIP file will contain all the essential files that you require to achieve positive root status.
- Once the ZIP file is downloaded please extract its contents and you will see the following files.
- op6-TWRP-Working-Installer.zip
- op6-boot.img
- op6-Root.zip
- op6-twrp.img
- op6-TWRP-Blue-FIX.zip
- Establish a connection between OnePlus 6 and PC via USB Cable. You require moving these files to the root directory of the internal storage of OnePlus 6. Please note that you need op6-twrp.img on the PC and hence, it doesn’t require to be transferred to the smartphone.
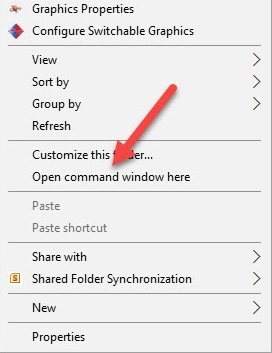
- Next, you require opening a command window inside the folder where you have the op6-twrp.img For this please right click and select the option of ‘Open Command Window Here’ from the pop-up menu that comes up. Alternatively, you can type ‘cmd’ in the address bar and hit the ‘Enter’ key.
- Please key in the following command in the window to reboot your OnePlus 6 into Bootloader mode.
adb reboot bootloader
- You might receive a pop-up window asking your confirmation to allow ‘USB Debugging.’ Just tap on ‘OK’ and we are done.
- Next, you require installing TWRP Custom Recovery on both the boot slots of OnePlus 6. Please rename the op6-twrp.img file to twrp.img and run the following two commands in the command prompt:
fastboot flash boot_a twrp.img
fastboot flash boot_b twrp.img
- Great! Once the installation is successful please reboot your device into recovery mode by simultaneously pressing and holding Volume Down + Power button.
- If you are using any kind of PIN or password for the device then you will be prompted to enter it to reach the TWRP Custom Recovery.
- You will see that the language is Chinese by default for the TWRP. For changing it to English please follow the below-mentioned
- Press and hold the Volume Up + Power button to make OnePlus 6 enter into Fastboot mode.
- Using the volume keys navigate to the option of ‘Recovery Mode’ and select the same using power button.
- If you are prompted to enter your password or PIN, do it. On the next screen navigate to Settings and click on the Globe icon and select English. You have successfully changed the language of TWRP.
- The TWRP main menu will appear in English now. From the files that you transferred to your device please install op6-boot.img using the ‘install’ option present in TWRP.
- Cool! Once this is done please proceed with the installation of TWRP Working Installer ZIP file as well as Blue-Fix Zip file.
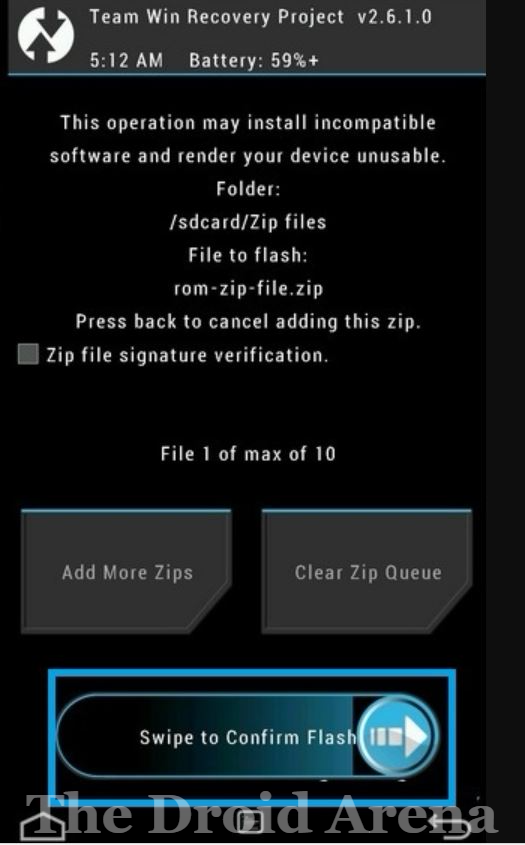
- Now we will be rooting OnePlus 6. For that again open TWRP menu and select the option of ‘Install.’ Navigate to the location where files were extracted at the beginning and select the op6-Root.zip file. We have Magisk running on this file. Swipe to confirm flash.
- Wait for few minutes. Once the process is over your device will automatically reboot or else you do it yourself.
- Congratulations! You have successfully rooted your OnePlus 6 smartphone.
How to Root One Plus 6 without Custom Recovery [MAGISK] [Method 2]
UPDATE: We have given below the complete guide on How To Root OnePlus 6 using Magisk without Custom Recovery [LATEST]
- Please make sure that you backup all your precious data before proceeding to root your OnePlus 6 as when you will unlock the bootloader of your device; everything will be wiped out.
- Also, you need to ensure that you are on the latest Oxygen OS.
- As a first step, please navigate to Settings-> About Phone. At the very bottom, you will be able to locate the option of ‘Build Number.’ Tap on it about 7 times to activate ‘Developer Options.’ You will be asked your PIN and post entering you will see the message ‘You are a Developer Now.’
- Now, navigate back to Settings -> Developer Options. Inside Developer Options please toggle on OEM Unlocking, USB Debugging as well as Advanced Rebooting.
- Once you are done with this please reboot your OnePlus 6 into bootloader mode and connect it to your PC/Laptop via USB Cable.
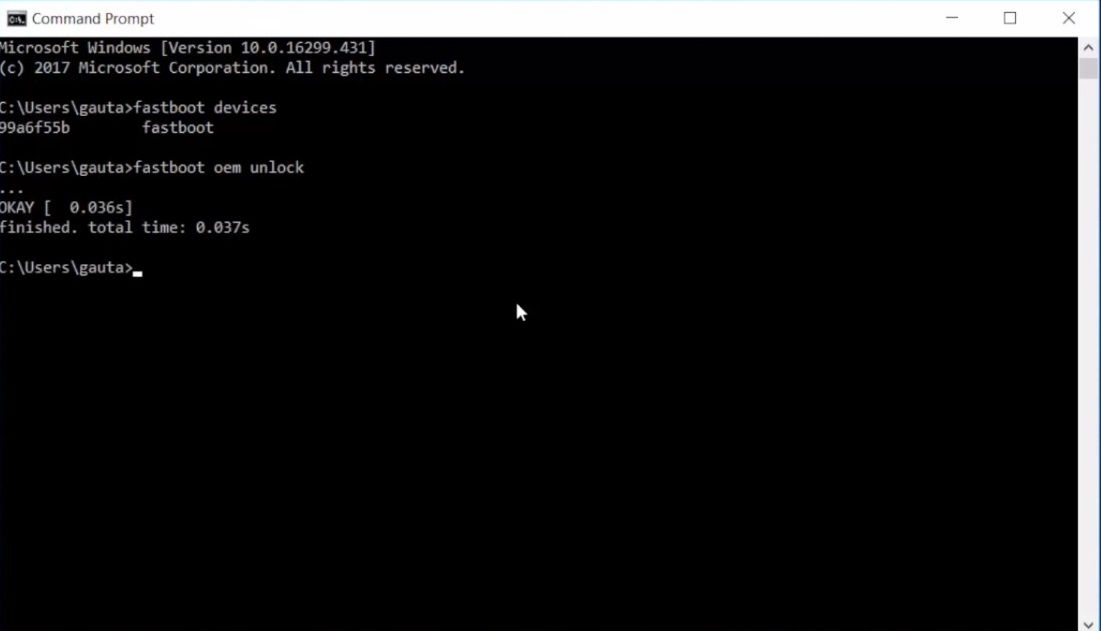
- Upon establishing a successful connection with your PC/Computer please open the Command Prompt on your PC and key in the following command to check that your OnePlus 6 is successfully getting detected via Fastboot.
fastboot devices
- Please note that for this command to work you need to install Minimal ADB and Fastboot drivers on your PC/Computer.
- After the above command please key in the following command to Unlock the bootloader of your OnePlus 6 device.
fastboot oem unlock
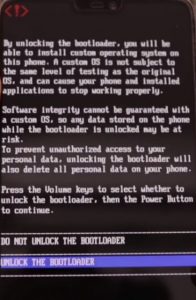
- Once you press ‘Enter’ after keying in the above-provided command you will see a screen on your phone with option ‘Unlock the Bootloader.’ You need to use Volume Keys to highlight and power key to select the needed option.
- The phone will reboot now and you might require choosing the initial settings for your device as everything will be wiped out. Avoid setting up any kind of security settings like Face Detection, PIN or fingerprint for now.
- When your device is ready; please navigate to Settings -> About Phone and again tap on Build Number about 7 times to activate Developer Options.
- Navigate to Settings -> Developer Options and you will find the OEM Unlocking will be enabled by default. Please toggle on USB Debugging and Advanced Reboot.
- Again, reboot your device into bootloader mode and if your device is not connected to your PC, please connect it via USB.
- From your PC please navigate here to the provided link. Once the webpage is loaded up scroll down and you will find the link to download the patched boot.img for your OnePlus 6. Please note that this file will always be updated to the current version of the Oxygen OS so make sure that you are running the Oxygen OS version accordingly before downloading the boot.img file.
- Post successful download of the file; navigate to the download folder and press Shift + Right Click. From the pop-up menu select the option of ‘Open Command Window’ here. Else, you can type in CMD in the address bar of the folder and hit ‘Enter’ to open the Command Window.
- Again key in the following command to make sure that your phone is detected by Fastboot.
fastboot devices
- Next, key in the below given command. You will find the name of the img file will get picked up automatically and the command will look like this:
fastboot boot patched_boot_magisk1642.img
- Hit ‘Enter’ and your OnePlus 6 will boot up using the patched boot image file.
- Now, move back to your computer and from the same link provided here download the Magisk Manager application. Once downloaded please move the same to the internal storage of your smartphone.
- Great! Now open File Manager application on your OnePlus 6 and install Magisk Manager on your device. Post successful installations of the same please open it.
- Tap on ‘Start Safety Net check’ option and hit ‘Yes’ on the pop-up that follows to download the proprietary code. The Safety Net Check should pass successfully.
- Next, move to Settings of Magisk Manager and select ‘Beta’ for update channel option. Once this is done go back to the main screen of Magisk Manager Application and ensure that both options under the Advanced Settings are checked.
- Hit on ‘Install’ and select the option of ‘Install’ again from the pop-up window that follows to install Magisk on your OnePlus 6.
- Select the Direct Method for installation and grant your permission for the installation procedure to start. Now, wait for the installation process to get over. Once it is done please tap on Reboot.
- After your phone has successfully rebooted open Magisk Manager and perform the Safety Net Check once again. It should be successful.
- Great! Now just open Play Store and download any Root Checker application to check the root status of your device. That’s it you have successfully rooted your OnePlus 6.
Thanks to B1CZU for this working Method and we will be keep updating this article in coming days with new working methods to root and flash custom recovery on OnePlus 6.
Install Custom ROM on your One Plus 6
In coming days will give you a complete update on Flashing TWRP on your brand new One Plus inorder to Install Custom ROM on the Same.
- Please again make your device enter into recovery mode by pressing and holding the button combination of ‘Volume Up + Power.’ TWRP Menu will be visible in front of you once your device has successfully entered into recovery mode.
- Select ‘Wipe’ and select ‘Swipe to Factory Reset’ from TWRP menu. However if the custom ROM which you are installing doesn’t require factory reset then you can forego of this step.
- Now tap on ‘Install’ option and choose the custom ROM from its location, in the internal memory of your One Plus 6, and do‘Swipe to confirm flash.’
- Once the ROM is successfully flashed an option of ‘Wipe cache/dalvik’ will come in front of you. Hit ‘Swipe to Wipe.’
- That’s it you are done. Just go back to the TWRP menu and select the option of Reboot – Reboot System.
Do you want to install the best music mod in your android device without root. Read More: [How To] Download and Install ViPER4Android on Android without Root.
Root One Plus 6 [OxygenOS 5.1.8, 5.1.7, 5.1.6, 5.1.5] and Install Custom Recovery
So my dear friends, this was the entire process for the task. If you have any confusion or query please drop down the same in comments section below. We will look into it. Also if you are getting stuck somewhere at any part of the entire process, please don’t hesitate to let us know about the problem which you are facing by dropping the same in comments section below. Looking forward to assist you.
You may like the following posts:
- Unlock Bootloader and Root Xiaomi MI Mix 2S [Complete Guide].
- Install Custom Themes Using Substratum on Android Device Without Root.
5 thoughts on “How to Root OnePlus 6 and Install TWRP Custom Recovery [OxygenOS 5.1.8, 5.1.7, 5.1.6, 5.1.5]”