
[How-To] Unlock Bootloader, Install TWRP & Root Asus Zenfone Max Pro M1
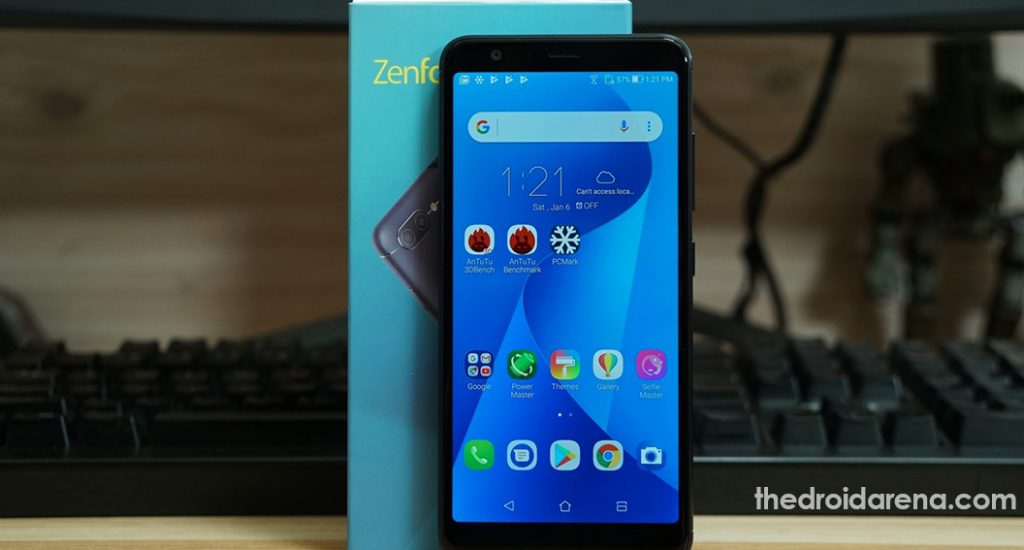
Launched in April 2018, Asus Zenfone Max Pro M1 blows you away with its in-budget price and amazing specifications. The 5.99 inches touch-screen offers a display resolution of 1080 pixels by 2160 pixels. The manufacturer has ensured that the device delivers superior performance by packing it with a Qualcomm Snapdragon octa-core processor and a 3 GB of RAM. Internal storage is 32 GB which can be expanded to a whooping 2000 GB via Micro SD Card.
Asus Zenfone Max Pro M1 doesn’t fails the shutterbugs even. It comes with a 13 megapixel rear camera and a 8 megapixel front camera to help you capture your beautiful moments perfectly. Running on Android Oreo 8.1 the device is powered with a 5000 mAh battery. All these extraordinary features are packed in a device that weighs just 180 grams. The dual SIM (GSM + GSM) functionality ensures that you need only one device for two numbers. Keep in mind that both SIM cards must be Nano in size.
The phone provides connectivity in the form of WiFi, GPS, Bluetooth, 3G & 4G. Moreover, the device also consists of a compass/magnetometer, proximity sensor, ambient light sensor and gyroscope. But, we are not here to talk about the features of the amazing Asus Zenfone Max Pro M1. This guide is for all Android enthusiasts who love to root their device. We will be sharing steps to unlock bootloader, install TWRP & root Asus Zenfone Max Pro M1.
Contents
How To Root Asus Zenfone Max Pro M1 | Prerequisites
Before beginning with the process please ensure that your device covers the following prerequisites:
- Please take a full backup of your personal and precious data before attempting to root your device.
- Make sure that your Asus Zenfone Max Pro M1 is charged to a capacity of at least 75-80%.
- The bootloader of your Asus device must be unlocked.
- ADB & Fastboot along with USB Drivers for your Android device must be installed on your PC/Laptop.
- TWRP Recovery must be installed on your Asus Device.
- Please download the latest Magisk application along with Magisk File Manager to root your device.
Unlock Bootloader of Asus Zenfone Max Pro M1 [STEPS]
- As a part of the essential prerequisites you require unlocking bootloader of your Asus Zenfone Max Pro M1.
- For that you need to download the unlock drivers along with the unlock script from here.
- Please extract the downloaded RAR file using any extraction tool on your PC.
- If you haven’t installed the Asus Android USB Drivers yet you will find the same in the extracted files. Along with that a second folder named as ‘Unlock‘ must be present.
- Post installing the USB Drivers; please power off your device and reboot into fastboot mode by pressing Volume Up + Power button simultaneously and holding it for 4-5 seconds.
- When in Fastboot mode connect your device to your PC.
- Once the connection is established please navigate to the ‘Unlock‘ folder and double click on the ‘unlock.cmd‘ file present in the respective folder.

- This will unlock the bootloader of your Asus Zenfone Max Pro M1.
Install Custom Recovery TWRP on Asus Zenfone Max Pro M1 [STEPS]
- Please download the TWRP image for your Asus Zenfone Max Pro M1 from here.
- Once the file is downloaded, please copy the same to the ‘Unlock‘ folder as mentioned-above.
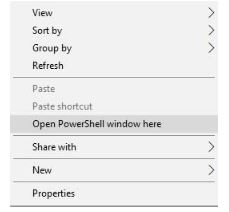
- Inside the folder please press Shift + Right Click and from the pop-up that comes up please select the option of ‘Open Power Shell Window Here.’
- The command window will open up in front of you. Now switch off your device and hold Volume Up + Power Button to boot your device into Fastboot mode.
- Your device must be connected to your PC. In the command window that opened up earlier please enter the following command to install TWRP Recovery on Asus Zenfone Max Pro M1.
fastboot flash recovery twrp-3.2.1-1-20180512-X00TD.img
- Once the installation process is successful please enter the following command to reboot your device.
fastboot reboot
Root Asus Zenfone Max Pro M1 Using Magisk [STEPS]
- As a first please switch off your device and boot into recovery mode by pressing and holding Volume Down + Power Button simultaneously for 3-4 seconds.
- Once the TWRP Recovery menu comes up please navigate to Wipe -> Format Data. Please enter ‘Yes‘ to continue.
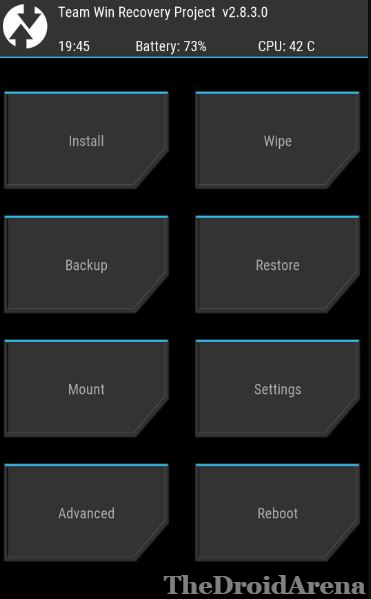
- Next, you need to head over to the option of Mount and click on the ‘Enable MTP‘ button.
- Please make sure that your device is connected to your PC from now on. You have already downloaded Magisk on your PC from the Prerequisites. Download ‘decrypt.zip‘ and copy the same, along with Magisk, to the internal storage of your Asus Zenfone Max Pro M1.
- Now, go back to the main TWRP menu and tap on the option of ‘Install.’ Select ‘decrypt.zip’ file.
- Thereafter, please select the option of ‘Add More ZIPS‘ and select the Magisk file as well.
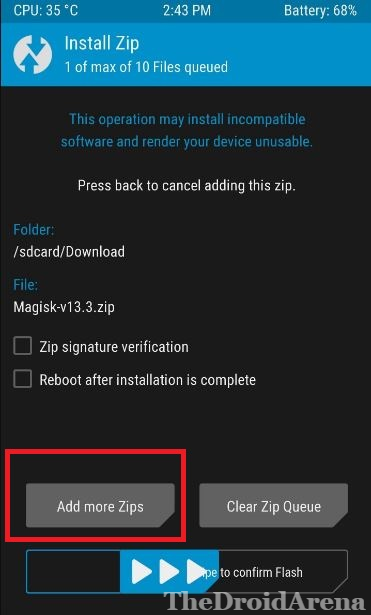
- Great! Now just swipe left to confirm flashing the ZIP file to your Asus device.
- Once the flashing process is complete please tap on the ‘Reboot’ button to restart your device. The phone will boot up to the rooted OS only.
Unlock Bootloader, Install Custom Recovery & Root Asus Zenfone Max Pro M1
That’s it! You have successfully rooted your Asus Zenfone Max Pro M1 device now. You can add a whole lot of features into your device using Magisk modules as well as install Custom ROMs on your Android device. For any questions or queries please use the comments section provided below.
You may like to read the following posts:
- How To Install Android P Beta on Google Pixel, Nokia, Xiaomi, Vivo and other Devices
- Install Android 8.1 Oreo on Moto X4 Android One Edition