
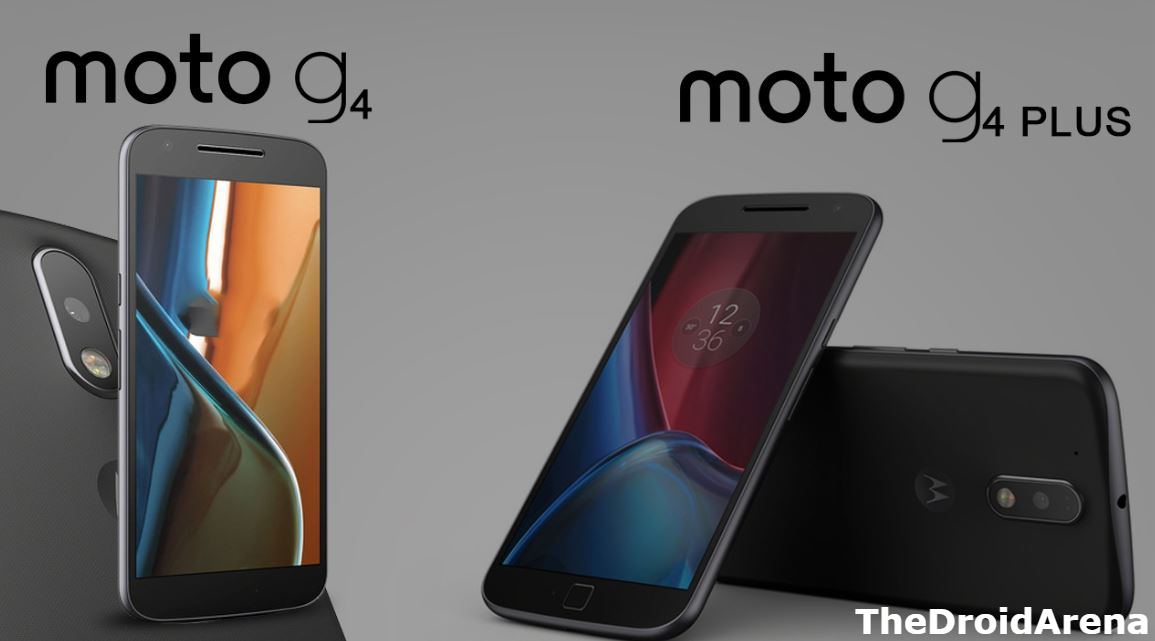
How To Install Android 8.1 Oreo on Moto G4/G4 Plus [Leaked Soak Test]
If you happen to own a Motorola device, you are well aware of the phenomenon of delayed software updates with the company. Motorola G4/G4 Plus were released way back in 2016 and came with Android Marshmallow out-of-the-box. Even though so much time has past after the release of Android Oreo 8.0 & 8.1, G4/G4 Plus were still devoid of the update. Lately, users of Motorola G4/G4 Plus displayed their outrage against the company which finally made Motorola to test Android 8.1 on G4/G4 Plus devices. As of now Motorola has conducted a soak test of Android 8.1 Oreo on G4/G4 Plus devices.
Install Android Oreo 8.1 Soak Test Beta Build on Motorola G4/G4 Plus
Do you own Motorola One Power Device? Check out the steps to root and install TWRP on the same from here.
Good news is that a beta build of Android 8.1 Oreo from the soak test has been leaked and if you wish like testing the new update, you can install the same on your Motorola G4/G4 Plus either via sideloading the OTA through stock recovery or you can perform a restore through TWRP recovery. Credit for fetching the Android 8.1 Oreo soak test build goes to XDA Senior Member rajatgupta1998. The OTA comes with a build number of OPJ28.128.
Contents
Bugs Present in the Build:
Please note that if you happen to follow the sideloading method, your phone’s bootloader will get updated to the Oreo version and you won’t be able to downgrade back to Nougat. Hence, if you happen to face any issues in the Soak Test build, you have to wait for the stable Oreo version to come up. However, if you choose to utilize TWRP backup to upgrade, the bootloader of your device won’t get updated and you can easily downgrade back to Nougat. Following are the known bugs present in the build:
- The camera is pretty slow on the first boot and it takes considerable time to launch.
- Switching between the front and rear camera takes a significant amount of time.
- Google Play Store displays the device as ‘Un-certified‘ as this isn’t a final public release.
Prerequisites:
- Please take a complete backup of your Android device before proceeding.
- Make sure that your Motorola G4/G4 Plus are charged with a battery level of at least 80%.
- If you are going to follow the Method 1 (sideloading through stock recovery) then your device must be on Nougat firmware with build number NPJS25.93-14-18. You can download the same from here.
- If you are going to follow the Method 2 (restoring from TWRP backup) then the your G4/G4 Plus device should have an unlocked bootloader and TWRP installed.
- Also, make sure that you boot your Moto G4/G4 Plus into TWRP recovery and take a backup of your EFS [TWRP -> Backup -> Select EFS -> Swipe to Backup]. Copy the EFS to an external SD Card or on the hard drive of your PC.
So, now you are aware of the necessary details regarding this update. If you wish to proceed with the update then continue reading below. For your convenience, we have detailed the steps for both the methods. You can choose any method according to your comfort.
Also check: Install Android 8.1 Oreo on Moto X4 Android One Edition.
Install Motorola G4/G4 Plus Android 8.1 Oreo Soak Test Beta Build | Downloads
Following are the download links for the soak test build:
OTA Package: Click Here to Download.
TWRP Backup: Click Here to Download.
Method 1: Sideload OTA Utilizing Stock Recovery
- As a first, please download the OTA Package for Android Oreo 8.1 Soak Test.
- Connect your Moto G4/G4 Plus to the PC via USB Cable.
- Please transfer the OTA Package to the root location of your device’s internal memory.
- Disconnect the phone from your PC and shut it down.
- Now, reboot your Moto device into bootloader mode by pressing the combination of Volume Down + Power button.
- Once your device enters into bootloader mode, using the volume keys scroll the menu until you see an option of ‘Recovery Mode.’ Press the Power Button to select the same.
- An Android Robot will come up on the screen.
- Press and hold the power button and simultaneously press the Volume Up button to boot into stock recovery mode.
- From the stock recovery mode menu, select the option of ‘Apply Update from SD Card.’
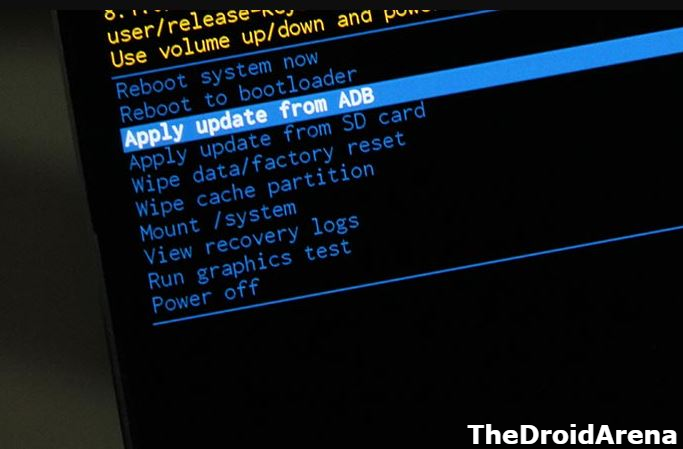
- Select the OTA package and press Power Button to confirm and install.
- Once the installation process gets over, please tap on ‘Reboot System Now.’
Method 2: Restore TWRP Backup
- Under this method you require downloading the TWRP Backup package.
- Boot your Moto G4/G4 Plus into TWRP mode and navigate to Wipe -> Format Data.
- Enter ‘yes‘ in the field to wipe clean your phone, including the internal storage as well.
- Next go to Mount from the TWRP main menu and tap on ‘Enable MTP.’
- Connect your Moto device to your PC.
- In your PC, please extract the contents from the ZIP file to get the TWRP Backup Folder (2018-11-23–13-24-15).
- Please copy the folder to sdcard (internal storage)/TWRP/BACKUPS/ folder.
- Disconnect your device and from the TWRP main screen, please press ‘Restore.’
- Select the backup package and make sure that both ‘System‘ and ‘Boot‘ are selected on the next screen.
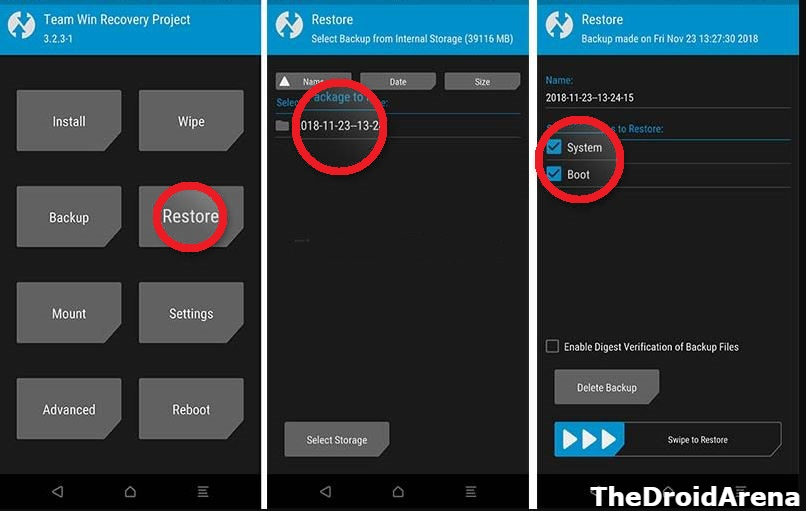
- Finally do a Swipe to Restore.
- Once the installation process is over, please click on ‘Reboot System Now.’
You should know that first boot will take a little time. Please don’t panic. Once your device boots up, you can enjoy the latest Android Oreo 8.1 on your Motorola G4/G4 Plus.
Install Android 8.1 Oreo on Moto G4/G4 Plus [Leaked Soak Test]
So, these were the two methods you can utilize to install Android 8.1 Oreo Leaked Soak Test Beta Build on your Motorola G4/G4 Plus device. If you have got any questions to ask regarding the tutorial please don’t hesitate and ask us the same via the comments section provided below. We are happy to answer your queries.
Check the following interesting posts as well:
- Root Moto Z3 and Install Magisk Custom Recovery [Tutorial].
- Root and Install TWRP on Moto G6 [Working Tutorial].