
How To Install Dolby Atmos on Android Oreo [8.0/8.1]
In the current scenario, we can find several kinds of stuff that comprised of smartphones. Usually, people go ahead to experience the amazing features of their Smartphones. Whenever Smartphone users use their device, they often go towards one of the features like Audio. You can see each and every device has the unique pattern and provides you with the different experience. When it comes to Audio stuff, people would expect the better sound quality. Unfortunately, not all the Android devices or headphones will provide you such exciting experience, though it has the manual settings to set.For this purpose, people are finding the way to adjust the audio system of the device and expect to get fine tune than usual it provides. In this case, Dolby Atmos is the sound technology that satisfies the music lovers by offering an amazing experience.
We know already many applications are there to provide you with the good quality of sound but still, Dolby Atmos packs a punch.For your information, this Dolby Atmos Oreo will be available through the flashable mod, and it supports the few devices like Nokia 6, Samsung Galaxy S9, ZTE Axon 7 and more.We are aware of the things that XDA community has a lot of developers where they provide us with a handful of unofficial developments to get a better experience on the phone. Recently, the device ZTE Axon 7 firmware has got ported to Dolby Atmos. This thing shows that the Android 8.0, as well as 8.1 oreo, is supported by Dolby Atmos.
Contents
Features and Prerequisites to download Dolby Atmos on Android Oreo
It is also essential for the seekers to check out the highlights of Dolby Atmos Oreo port before going to download for their device. Let’s have a look at below.
- It supports majorly with SELinux mode.
- No need for deep adjustments after the installation process is done.
- It also adapted to root solutions such as Magisk and SuperSU.
- Based on root method, it offers the system as well as system fewer installation modes.
Also, it is important for the people to get to know that is after the installation process of Dolby Atmos on Android Oreo is completed, it requires the deep adjustment. One should know that you can find two flashable ZIPs of Dolby Atmos Oreo is available such as Unity and Standard. Before going deep into the downloading process of Dolby Atmos on your device, it is essential to cover the requirements further. For more details regarding the requirements can follow below.
- It is important for Android Oreo device to get installed with TWRP Recovery.
- Make sure to charge up your battery up to 80% to avoid the issues while downloading process.
- Get a Nandroid backup of current ROM. To do further
- It is essential to install TWRP Recovery
- Then visit Backup menu and go to swipe to back up button.
After the above requirements are done, you can now follow the process of installing Dolby Atmos without any hassles.
You can easily install the Audio mod called as ViPer4Android on your android device by following this guide. Read More: [How To] Download and Install ViPER4Android on Android without Root.
Download Dolby Atmos Oreo Flashable ZIP
It is always essential for the users to find the original XDA thread when it comes to downloading the recent version which is available in online. For your information, Dolby Atmos Oreo mod is getting updated most of the time. So, it is essential for you to find the latest stuff for downloading.
- Unity: DolbyAtmos_Axon7_Oreo_Unity_2.20.18.zip (Zackptg5)
- Standard: DolbyAtmos_for_Oreo_20180219.zip (guitardedhero)
How To Install Dolby Atmos on Android Oreo [8.0/8.1]
If you are looking for the steps to follow for downloading Dolby Atmos Oreo can follow the below steps.
- First, you need to download the Dolby Atmos Oreo flashable ZIP.
- Now, it is essential for you to connect your device to your PC via USB cable.
- Make sure to enable the MTP or Transfer files mode without any miss.
- Now, get ready to copy the downloaded Dolby Atmos Oreo ZIP pack to SD or storage device.
- You can now disconnect the device and proceed to turn it off.
- Then, to boot into TWRP recovery mode by pressing power and volume down button together.
- By visiting TWRP, you can go to the option Install.
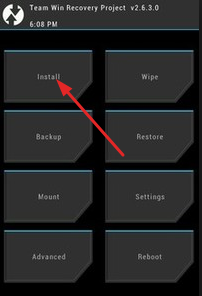
Boot to TWRP to Install Dolby Atmos
- Visit the location of Installer ZIP is located.
- Now, select the file displaying on the screen and swipe the available button to install Dolby Atmos Oreo 8.0 as well as 8.1.
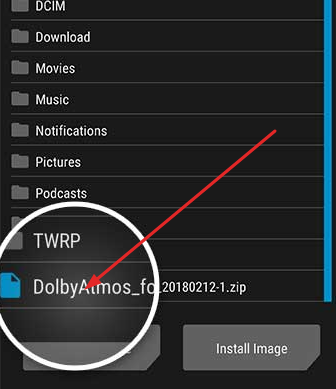
Select Dolby Atmos zip file
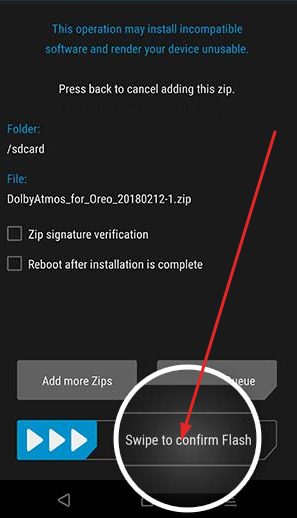
Install Dolby Atmos
- Within a few seconds, the flashing process will be done
- You can now tap on Reboot system button.
- After the device gets booted, visit app drawer and launch the application.
Must Read: How to download and Install Google HDR+ camera on android devices.
Conclusion: How to Download & Install Dolby Atmos on Android Oreo [8.0/8.1]
For better sound experience, we can find many applications for your device. But Dolby Atmos will always stand as the great thing to offer you the stunning audio experience with a super cool quality than expected. For installation process, you can follow the above-given procedure at any time.
Read the following articles:
- [How To] Install Substratum on Galaxy S9/S9+ Without Root.
- Access Google Lens without Root on Any Android Smartphone.
One thought on “How To Install Dolby Atmos on Android Oreo [8.0/8.1]”